Pages

Wednesday, July 24, 2013

Set Your Table with Flair--Whimsical Easter Setting

I'm sure we've all attended holiday gatherings as children. I have distinct memories of being seated at the "kids' table."  Why should the kids' table be the typical sad card table haphazardly set with mismatched chairs and dinnerware?   I love entertaining, so I enjoy having family over; especially for holidays.  I usually set two tables; this is how I set an Easter Holiday table for children.  

When putting together this setting, I think of pastel colors infused with playful place settings.  I began with a lavender colored tablecloth and these flower placemats.  I used two of each color in my set, choosing to omit the lavender, which I think looks washed out against the lavender cloth. 


Next, I placed these adorable polka-dotted plates in opposing colors onto the mats. 


The salad plates, which I placed next, match the placemat. 


Now that there were three colors on each setting, I opted to place whichever color had not been used when I set the bowls. 


When I placed the saucer, I again chose to place on each setting whichever color had not been featured.


I placed the mugs on the saucers, again choosing to match the placemat. I then placed a matching napkin ring and pastel colored napkin. All complete for a fun (not glum) Easter setting!

From my collection:

Polka-Dot Service, Horchow
Flower Placemats, Homegoods 
Napkins and table linen, generic  


If you enjoy this post, please visit the archives!  You may also visit my full profile to view my other blogs. Connect with me on my Facebook Page, Parsimonious Décor Darling.   You might like to visit my other blog hubs,

The Marvelous Maison, a lifestyle blog hub and 
Frugal Fab Fashionista, my fashion blog hub. 

Follow me on Pinterest!!  Please be sure to kindly follow the board guidelines, as it takes time and effort to find fabulous pins across the Internet and Pinterest!  Thank you!  

Thank you for stopping by! ❤


Friday, July 19, 2013

Set Your Table with Flair--My Steampunk Party Setting

The steampunk trend is just exploding!   When I recently wrote my blog about a steampunk wedding on my other blog, The Bride Ideal (to see the post, click here), I thought, how fun would it be to throw a steampunk-styled gathering?  Here is how I would set my table. For this theme, I would stick to earth tones, beiges, and black. Here are two examples. 

For the first look, I used copper colored napkin rings. 


This second look is the same setting but I opted to switch out the copper napkin rings and used wired burlap ribbon instead for a more natural, vintage look. 

Here is a close up. 


From my collection:

Ralph Lauren Clock Brunch Plates
Accoutrement; all, Ralph Lauren Wentworth Tortoise
          Serving Tray
          Salt and Pepper Shakers
          Bar Tools
          Butter spreaders
Lauren Ralph Lauren Linens Tablecloth
Generic barware, napkins and placemats
In the first look, copper capiz shell napkin rings, Horchow 
Flowers, my garden
Vase, one of the barware glasses with burlap tied around. 

For more wonderful ideas, I recommend The Vintage Tea Party Book. It is full of tips, photography, recipes, and FUN!


If you enjoy this post, please visit the archives!  You may also visit my full profile to view my other blogs.  You might especially enjoy my blog The Crafting Table.  There are tips in invitation making as well as party favors.  Connect with me on my Facebook Page, Parsimonious Décor Darling.   You might like to visit my other blog hubs,

The Marvelous Maison, a lifestyle blog hub and 
Frugal Fab Fashionista, my fashion blog hub. 

Follow me on Pinterest!!  Please be sure to kindly follow the board guidelines, as it takes time and effort to find fabulous pins across the Internet and Pinterest!  Thank you!  

Thank you for stopping by! ❤


Set Your Table with Flair--Nautical Summer Style


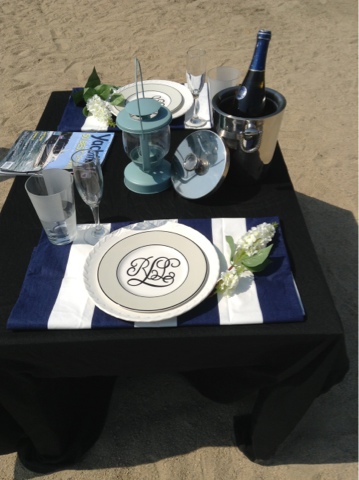
With the dog days of summer upon us, it is a great time to hit the beach.  I love the idea of a beach get-together, especially with someone you love.  This is my interpretation for a romantic table-for-two on the beach.


Closeup.


When choosing how to set a table, my personal preference is to try to keep to a straight forward, clean palette. In this theme, I used fresh Nautical Colors and black as a daring accent color. From my collection:

Ralph Lauren Whipstich Cream Plate
Ralph Lauren Intaglio saucer
Ralph Lauren Equestrian Braid Ice Bucket
Nautica Frost Block glassware
Stemware Generic 
Placemats:  Lauren Ralph Lauren University
Target home collection tablecloth
Ikea lantern
Faux snapdragons from Tai Pan Trading Company
Martin & Rossi Asti Moscato D'Asti Sparkling Wine


If you enjoy this post, please visit the archives!  You may also visit my full profile to view my other blogs. Connect with me on my Facebook Page, Parsimonious Décor Darling.   You might like to visit my other blog hubs,

The Marvelous Maison, a lifestyle blog hub and 
Frugal Fab Fashionista, my fashion blog hub. 

Follow me on Pinterest!!  Please be sure to kindly follow the board guidelines, as it takes time and effort to find fabulous pins across the Internet and Pinterest!  Thank you!  

Thank you for stopping by! ❤


Shabby Chic Farmhouse Storage

In my wildest fantasies, everything in my household would remain copacetic 24/7. As we mature, idealistic principles are replaced with reality. 
:)
Not one to be easily dissuaded, I still do try. Lol. During spring cleaning this year, I found these adorable bins at Marshall's. I love that they have the rustic appeal of something you would see in a French Provençal country house. I also like the fact that these come in different sizes. I used an Old-English font to label these, and voilà! 


I also use these to organize my kiddos' art supplies. 


If you enjoy this post, please visit the archives!  You may also visit my full profile to view my other blogs. Connect with me on my Facebook Page, Parsimonious Décor Darling.   You might like to visit my other blog hubs,

The Marvelous Maison, a lifestyle blog hub and 
Frugal Fab Fashionista, my fashion blog hub. 

Follow me on Pinterest!!  Please be sure to kindly follow the board guidelines, as it takes time and effort to find fabulous pins across the Internet and Pinterest!  Thank you!  

Thank you for stopping by! ❤


Set Your Table with Flair--Spring Tea

I've always loved the idea of the English high tea. Perhaps it has to do with my love for Lewis Carroll as a child. Nevertheless, here is how I incorporated some adorable finds into a lovely setting for a tea brunch in the garden. Here are a few shots of the table, sans linen. 


Centerpiece.    I chose blooms of soft green and white; these colors epitomize garden for me.


Closeup of the plates.  I just love these butterfly dishes, I think they are darling for springtime!


The setting.


To give an outdoor setting a more rustic feel, you can add unironed linen.  Not ironing the linen provides an antique feel for this setting. 


Close up. 


From my collection:

Butterfly dinnerware from Horchow/Neiman Marcus
Ralph Lauren Glen Plaid barware
Stemware, Generic
Shoe and Handbag cake service, Neiman Marcus 
Tea service, Godinger Hotel Collection, Horchow/Neiman Marcus
Faux Snapdragons and blue apothecary jars used as vases, Tai Pan Trading
Green Faux hydrangeas, Walmart
Peony napkin holders, Bed, Bath and Beyond
Tea Cart, local antique
Bench, hand-built by yours truly ☺


If you enjoy this post, please visit the archives!  You may also visit my full profile to view my other blogs. Connect with me on my Facebook Page, Parsimonious Décor Darling.   You might like to visit my other blog hubs,

The Marvelous Maison, a lifestyle blog hub and 
Frugal Fab Fashionista, my fashion blog hub. 

Follow me on Pinterest!!  Please be sure to kindly follow the board guidelines, as it takes time and effort to find fabulous pins across the Internet and Pinterest!  Thank you!  

Thank you for stopping by! ❤


Set Your Table with Flair--Romantic Garden Table setting

This time of year, most people love to be out-of-doors enjoying a backyard BBQ. If you are a romantic at heart like I am, the idea of a sweet garden soirée at dusk is for you.

Here, I played up the romance of that theme by using a sweet, muted palette. 


From my collection:

Ralph Lauren Glen Plaid Barware
Stemware, Generic 
Blue and Cream Damask Plates, Corrine Collection, Horchow 
Charger plates, Pottery Barn
Blue Apothecary Jars and White Faux Snapdragons, Tai Pan Trading
Green Faux Hydrangeas, Walmart 
Cortona Collection Extending Table, Pottery Barn
Bench, hand-built by yours truly ❤


If you enjoy this post, please visit the archives!  You may also visit my full profile to view my other blogs. Connect with me on my Facebook Page, Parsimonious Décor Darling.   You might like to visit my other blog hubs,

The Marvelous Maison, a lifestyle blog hub and 
Frugal Fab Fashionista, my fashion blog hub. 

Follow me on Pinterest!!  Please be sure to kindly follow the board guidelines, as it takes time and effort to find fabulous pins across the Internet and Pinterest!  Thank you!  

Thank you for stopping by! ❤


Tai Pan Tripping

It's officially spring, and during this time of year, I really enjoy being out in the garden. It's a great opportunity to share a quiet activity with your children; and for me, helps me decompress. 

I wanted to do a quick post about my recent excursion to Tai Pan Trading. If you love home décor like me, you HAVE to visit that store. Here is one item I picked up while there. I love planters, and the cold snap last winter left much of my landscape dissipated. 
This time of year, local hardware stores are practically brimming with annuals and perennials. I paid approximately $30 for the plants. I filled the planter with miracle grow soil as a foundation, broke apart the roots, and put enough soil to fill it.   

Next, I installed a drip line into the planter and used mulch to hide the tiny pipes. This is the result at the top hill of my yard.


If you enjoy this post, please visit the archives!  You may also visit my full profile to view my other blogs. Connect with me on my Facebook Page, Parsimonious Décor Darling.   You might like to visit my other blog hubs,

The Marvelous Maison, a lifestyle blog hub and 
Frugal Fab Fashionista, my fashion blog hub. 

Follow me on Pinterest!!  Please be sure to kindly follow the board guidelines, as it takes time and effort to find fabulous pins across the Internet and Pinterest!  Thank you!  

Thank you for stopping by! ❤


Maaaaavelous Mirror Makeover #1

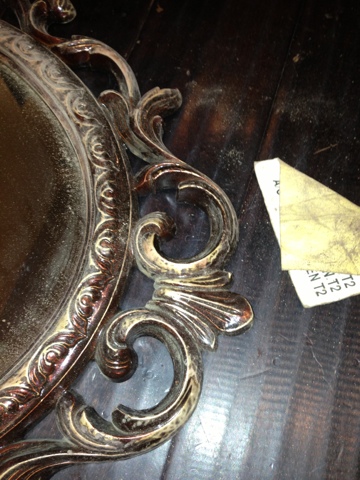
I am always trolling for ideas, as I like to keep the décor in my house fresh. I found these incredible mirrors on one such trip. These mirrors were $90 each at the Salvation Army. There were four mirrors total, two of the elaborate and two of the plainer ones. I got a great deal on these on a 50% off all furniture day, so I paid $180 for all four. What I love about these is that they were not cheap plastic or plaster. These were very heavy-duty mirrors you would have to feel yourself to appreciate the heft. I had looked at ZGallerie, West Elm, Horchow, and Pottery Barn. Of course, one can find this type of mirror, but they typically cost $200 or more per mirror. 


I began by sanding, sanding, and sanding some more.


All sanded!! I didn't want to take all the stain off because I wanted some to show through for an antiqued patina effect (or so I hoped).


Next, I used a clean paintbrush to remove any excess sawdust.


The paint I chose is a specialty color in Ms. Stewart's metallic line. Thanks, Martha!!


Time to protect the glass. I love frog tape.....


Now, the stain


Once the paint was dry, I removed paint here and there. Again, for an antiqued effect. For me, it's all trial and error. After trying the fingernail, failing, I found that using the backside of a butter knife worked.....


Here is a close up. 


And lastly, violà!! On my wall in the foyer.


.....And the other in the dining/living area. 


If you enjoy this post, please visit the archives!  You may also visit my full profile to view my other blogs. Connect with me on my Facebook Page, Parsimonious Décor Darling.   You might like to visit my other blog hubs,

The Marvelous Maison, a lifestyle blog hub and 
Frugal Fab Fashionista, my fashion blog hub. 

Follow me on Pinterest!!  Please be sure to kindly follow the board guidelines, as it takes time and effort to find fabulous pins across the Internet and Pinterest!  Thank you!  

Thank you for stopping by! ❤


Beautify Your Existing Cabinets

I often tell my hubby, sometimes you have to throw caution to the wind and just DO.  When we bought our house, the kitchen had plain, stark-white cabinets. Unfortunately, I completed the following project before I would have even fathomed writing a blog (we have five munchkins), so I don't have pictures. I can, however, guide you through what I did. 

First, I chose a new color. Our humble Casa is a Mediterranean, so I opted for a warm color; French Latte. 


To create the antiqued look, I used a dark espresso paint.


First, I painted all of the cabinets with the Latte color. Allow for dry time. If you do not want to sand, use a primer first.

Next, in varying places on the cabinets, and especially the corners, I painted with the espresso paint in an extremely thin coat.  Alloy to dry. Sand very lightly with the finest grade sandpaper, making sure not to remove too much of the espresso color. Wipe clean with a damp towel and allow to dry. Next, I applied a coat of the French Latte over the espresso, and carefully wiped small amounts of it away with a clean paper towel. Last, I replaced the plain white drawer pulls with oil-rubbed bronze.  You can buy these in bulk very inexpensively at hardware stores. I also recommend using a clear polyurethane over the finished cabinets to preserve the paint job.  Here is the result. 


Next, I wanted to upgrade the area beneath the bar.  First, I measured the bar area and chose corbels that would fit.  I decided on this model.  It wasn't overly expensive, and ornate enough that they didn't appear cheap. 

I completely painted the corbels in the French Latte. Next, I upgraded the plain wall beneath the bar. I accomplished it by using wainscot panelling. It comes in small or large pieces, and you can just clip them together based upon how much you need. 


I nailed up the amount needed using very small nails, and puttied the holes using Dap nail hole filler.  Next, I painted the wainscot to match.  I put up floorboards that I had pre-painted white. The hubby drilled the corbel in by going underneath the cabinet on the opposite side. I filled in any gaps using the Dap and my finger, wiping any excess with a clean paper towel. Allow for dry time, and paint to match. Here is the end result. 


If you enjoy this post, please visit the archives!  You may also visit my full profile to view my other blogs. Connect with me on my Facebook Page, Parsimonious Décor Darling.   You might like to visit my other blog hubs,

The Marvelous Maison, a lifestyle blog hub and 
Frugal Fab Fashionista, my fashion blog hub. 

Follow me on Pinterest!!  Please be sure to kindly follow the board guidelines, as it takes time and effort to find fabulous pins across the Internet and Pinterest!  Thank you!  

Thank you for stopping by! ❤