Pages

Friday, January 24, 2014

Manicuring the Yucca

Hello, friends!  Thank you for taking the time to stop by my blog!

One reason we have likely stuck here in California as long as we have is the wonderful weather!  Yesterday it was so lovely out the kiddos and I spent some much needed time out-of-doors. For me, outdoors usually means tinkering around in the garden.  Today's post will feature how I sculpt my yuccas. 

The soil in my garden is very hard, filled with stone, and it was near impossible for us to get anything to grow there.  Enter the yucca. These plants are incredibly hardy, maintain and grow easily, and are aesthetically appealing. When it is cold out, these plants still continue their growth but I noticed mine had become perhaps a little overgrown over the winter.  Here is a shot of the before. 


I began by removing a few of the excess smaller limbs.  Next, I removed foliage from the limbs using a quick downward jerking motion.  Be sure to wear gloves!!  Not only are these spiny and pointy on top, the leaves themselves are incredibly sharp!  Begin at the bottom, and work your way up the limb.


Closer........


I like to remove the foliage in varying heights.


After I finish the removal of all the leaves I desire, I like to trim the leaves. I truly love the appearance of a bluntly-cut yucca.  I use standard craft scissors, they are small and easier to work with (at least for me) than shears for this type of landscaping.  

I used my trusty ladder to get those pesky ones on top (geez, I'm shrimpy, yuccas aren't that tall!  Lol)


A little bit of cleanup later, and here are the results.  The whole process was about an hour (it would go faster if I weren't an arachnophobe carefully looking before each trim, hee) and I finished just before dusk.


If you enjoy this post, please visit the archives!  You may also visit my full profile to view my other blogs. Connect with me on my Facebook Page, Parsimonious Décor Darling.   You might like to visit my other blog hubs,

The Marvelous Maison, a lifestyle blog hub and 
Frugal Fab Fashionista, my fashion blog hub. 

Follow me on Pinterest!!  Please be sure to kindly follow the board guidelines, as it takes time and effort to find fabulous pins across the Internet and Pinterest!  Thank you!  

Thank you for stopping by! ❤


Monday, January 20, 2014

Set Your Table With Flair--A Very Victoria Valentine's


Hello, Friends!  Thank you for visiting my blog! 

Valentine's Day is almost here!  For me, Valentine's Day is synonymous with romance...what better way to indulge than with lovely lingerie?  I thought it would be fun to have a few gal-pals over, and all go on a shopping excursion to one of my favorite shopping haunts in preparation. 

Ever since the first Victoria's Secret ad campaign I saw in Vogue Magazine waaay back in 1989, I have been a fan.   In the campaign, a gorgeous woman is walking up a beautiful cascading staircase in a floating robe, telling the handsome man at the bottom of the staircase, "Shhh, I have a secret (I may be paraphrasing here)."  The campaign was brilliantly done, a sort of soap opera, and I was instantly hooked.   

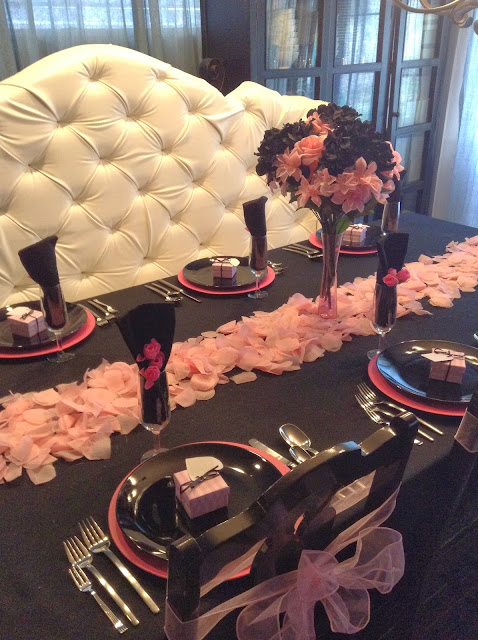
This is how I set my table as a sort of homage to the brand. 

First, I set this black tablecloth. 

Next, I placed these pink chargers. 

On top of the pink chargers, I set plain black plates. 

Down the middle of the table, I set four bags of faux pink rose petals. 

Shown here. 

Next, I created a small floral arrangement using this pink vase. 

I filled the vase will a small amount of heart-shaped gem beads.

Here is the arrangement. The arrangement consists of faux black peonies, faux pink roses, and faux pink columbines. 

Closeup. 

Next, I placed a flute at each setting with a plain black napkin inside.  

Inside the flute, I placed tiny roses. I removed the roses off of a simple rose spray.


Here is a closeup. 

On each chair, I tied a double-loop bow with this sheer pink ribbon.  


Shown here. 


Finally, I placed silverware in the traditional dinner style and one of these mini Victoria's Secret themed name-place presents at each setting. To view the tutorial about how to make these, you may visit the post in my blog The Crafting Table by clicking here.

Here is the complete Tablescape. 


Closeups of the setting. 


From my collection:

Tablecloth, generic, Target
Flutes, generic
Pink chargers and black plates, generic
Silverware, Mikasa Zena Satin Collection 
Tiny desert forks, Grace Teaware, from HomeGoods 
Napkins, generic, TJ Maxx/HomeGoods
Ribbon and tiny roses floral spray, 99¢ Store
Faux roses, pink petals, and faux pink columbines, The Dollar Tree
Faux black peonies, Michael's Crafts


If you enjoy this post, please visit the archives!  You may also visit my full profile to view my other blogs. Connect with me on my Facebook Page, Parsimonious Décor Darling.   You might like to visit my other blog hubs,

The Marvelous Maison, a lifestyle blog hub and 
Frugal Fab Fashionista, my fashion blog hub. 

Follow me on Pinterest!!  Please be sure to kindly follow the board guidelines, as it takes time and effort to find fabulous pins across the Internet and Pinterest!  Thank you!  

Thank you for stopping by! ❤


See this post and more at The Tablescaper!


Monday, January 13, 2014

Set Your Table With Flair--A Romantic Setting For Two

Hello, friends and lovebirds!  Thank you for visiting my blog!  I hope everyone has had a wonderful start to the new year!  

With Valentine's Day coming very soon, I wanted to do a tablescape suited for sweethearts.  A few years back, I surprised my husband with an adorable table I'd set for two, champagne, and homemade bouillabaisse. He still speaks of it fondly today, so in this post I'd like to attempt to replicate that setting.  

First, I laid a silvery-white tablecloth, which made a nice contrast against my dark wood floors. 

Next, I scattered rose petals.


I placed my antique cart on top of the cloth and petals. 

I love this cart I found at a local antique mall!  It even has scrolled hearts on the wheels.....cute, no?

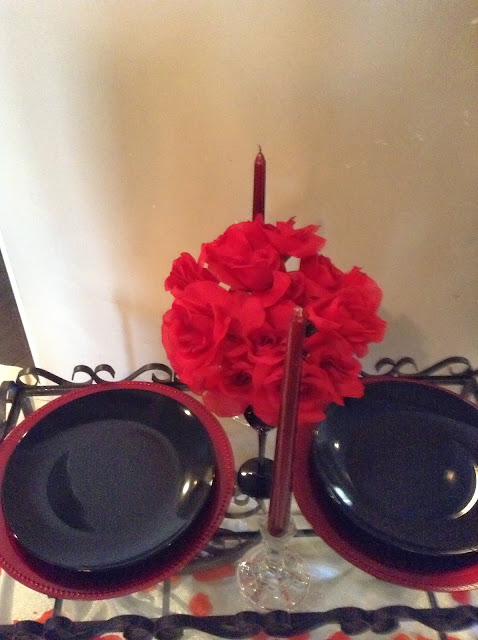
I placed two vibrant red chargers. 

On top, two black plates. 

Next, I placed candleholders and crimson-colored candles.  VaVoom!

In the center of the two candles, I placed a small floral arrangement of faux red roses.


The space on the cart is very limited, so I opted to use a black flute in lieu of a vase.


On each plate, I placed a clear flute. 

In each flute, I placed a quasi-heart napkin. 

To fold the napkins, I started with a standard red napkin, folded it half, and in half again.  Then, I folded it diagonally. Pull one corner of the straight edge toward the point.  Repeat on the other side. You should now have a napkin with a top loop half-circle. I placed the napkin into the flute, pointed sides facing downward. Right in the middle of the half-circle, I gently pressed the napkin down, forming a heart (or is it bunny ears....well, I did say quasi-heart, lol).


Another thing I love about this cart is the side, where there is room for beverage service if you prefer.  

Top the setting off with a bottle of bubbly, all set!!


If you enjoy this post, please visit the archives!  You may also visit my full profile to view my other blogs. Connect with me on my Facebook Page, Parsimonious Décor Darling.   You might like to visit my other blog hubs,

The Marvelous Maison, a lifestyle blog hub and 
Frugal Fab Fashionista, my fashion blog hub. 

Follow me on Pinterest!!  Please be sure to kindly follow the board guidelines, as it takes time and effort to find fabulous pins across the Internet and Pinterest!  Thank you!  

Thank you for stopping by! ❤