Hello, friends!
If you have read my blog (or seen my pinterest boards, for that matter), you know that I am a self-proclaimed epicurean. While I am nowhere near a professional cuisinère, I love cooking, and I love exploring different types of culinary delights.
Summertime is a great time for entertaining, and when cooking, there's nothing better than having fresh herbs on-hand and ready for use. Today I will be sharing how to make a simple cottage-style herb garden for the kitchen countertop or windowsill for less than $20. I hope you enjoy the post!
You will need:
1 Set three galvanized buckets (flower pots) and tray, I found mine at The 99¢ Store
Modpodge
Burlap fabric or extra-wide burlap ribbon
Spray adhesive
Printer paper
Printer and printer ink
Scissors
Paint brush
Living herbs from the local grocer
Garden soil
First, using a free photo-editing software, create the graphic you want. I chose to write the names for my herbs in French for a little cottage-y appeal. I used Picmonkey to create this simple graphic. Once you have designed your graphic, print.
Cut the names of the herbs out.
Size the names of the herbs on your piece of burlap or burlap ribbon, and trim to size, leaving the burlap a bit bigger than the name. If you are using burlap ribbon like I did, you may want to remove the welted edges and unravel a few rows for a bit more rustic appeal.
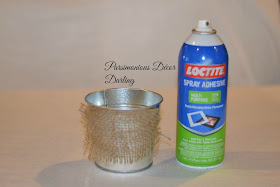
Spray a minimal amount of the spray adhesive onto your mini bucket, enough for the burlap to adhere to the surface.
Shown here.
Using the paintbrush, brush a small amount of Modpodge onto the burlap.
Place the paper with the wording centered in the middle of the strip of burlap. Paint over with the Modpodge. Allow to dry. I set mine outside in the 100+ degrees California sun, so they dried quite fast!
Once they have completely dried, Modpodge them again.
So cute.
Now, these are ready for fresh herbs.
Add a small amount of enriched soil to each of your mini buckets, and water the soil.
Gently break apart the roots of your herbs to promote growth.
Add to your mini buckets. Top off with soil, and water once more. Violà!! It smells like a wonderful Italian restaurant as I am working...mmmm, so good!
This project was so easy, inexpensive, and the herbs taste lovely! I buy these often, so I thought, why not keep them growing and easily accessible? You may pin if you like this tutorial:
I hope you are enjoying the beautiful summer weather! Until next we meet...
Ruffled Apron with lace rosette, Jillie Willie, Horchow/Neiman Marcus
Crocheted Tea Towels, Boutross Linens, Horchow/Neiman Marcus
If you enjoy this post, please visit the archives! You may also visit my full profile to view my other blogs. Connect with me on my Facebook Page, Parsimonious Décor Darling. You might like to visit my other blog hubs,
The Marvelous Maison, a lifestyle blog hub and
Frugal Fab Fashionista, my fashion blog hub.
Follow me on Pinterest!! Please be sure to kindly follow the board guidelines, as it takes time and effort to find fabulous pins across the Internet and Pinterest! Thank you!
Thank you for stopping by! ❤


So Sweet!! What a great project! Thanks so much for taking the time to sop by!!
ReplyDeleteHugs,
Deb
Thank you, Deb! I loved your Independence Day tree!
DeleteWhat a great idea! I like it much better than what I did! I purchased 7 different aloe plants from Amazon at Christmas; I also bought yellow pots/tray set (Amazon) and repotted for my indoor window in kitchen. While it is bright and cheery, those pots are plastic and I really like your rustic much better!! I can't put the plastic outside in the sun so I am going to apply this tutorial and change my pots and go get some herbs. I LOVE fresh herbs and now have no excuse such as, "I don't know howwwww" (whine). Thank you for sharing something so easy to do!
ReplyDeleteYou're welcome! Your project sounds fun as well!
DeleteLove this project! It was great hearing from you, thanks so much for stopping by!
ReplyDeleteHugs, Jody ♥
Thank you, Jody!
DeleteLove your herb garden!Thanks for sharing!
ReplyDeleteYou are welcome! Thank you for visiting!
DeleteSO cute!!! Thank you for sharing the "how to."
ReplyDeletePatti :)
Thank you!
DeleteGreat project. The herbs will be a great addition to cooking and the containers look amazing. Have a great day. Sylvia D.
ReplyDeleteThank you!
DeleteThis turned out so cute! I totally need an herb garden. But first, I need to add some shelves to our kitchen so our cats can't get to it. They eat everything in sight!
ReplyDeleteThank you, Meg!
DeleteThat is very cute! Thanks for sharing at Home Sweet Home!
ReplyDeleteThank you very much, Sherry!
DeleteLove the idea of the little pots. I could see using them in so many different ways.
ReplyDeleteThank you! Sounds like fun projects ahead...
DeleteVery cute! I love using herbs in my cooking. Right now I have my herb garden right outside my kitchen door. Come Winter I like to plant a few and sit in my windowsill. Thanks for sharing with SYC.
ReplyDeletehugs,
Jann
Aren't they THE BEST!? Even my kiddos love munching on them, lol. Thank you so much for dropping by, Jann.
DeleteWhat a cute idea! I had some rosemary and lemon thyme plants in my kitchen but they died while I was away on vacation! Time to plant some more! I'll have to check out my Dollar Store:) Thanks for sharing at Vintage Charm! xo Kathleen|Our Hopeful Home
ReplyDeleteThank you so much, Kathleen!
Delete