Friday, December 13, 2013

O Tannenbaum--Decorating For Christmas the Parsimonious Way

Hello, Friends!!  Thank you so much for taking the time to visit my blog!

It is amazing how fast the seasons change; one day you look up and realize you are your parents' age.  I cannot believe it is almost Christmas!  The first week December for me signifies that it is time to take down the festive Fall fare, and time for rockin' around the Christmas tree! 

I am a gal who adores Christmas traditions, so for the outside of my house, I wanted the décor to emulate that feel.  First, I placed these festive swags on my door.


If you would like to view the tutorial about how to make these, you may do so by visiting my other blog, The Crafting Table, by clicking here.


On top of my scrolled placemat,


I placed our Christmas welcome mat. It's old and worn, but we've had it since our firstborn was a baby, so it holds special sentimental value for us.  


Next, I placed these two lighted topiary planters on either side of the door.  I decorated these with traditional colors such as red, green, and gold.  


Next, I placed this adorable lamppost box right in the planter just outside my door.


I have a small garden pedestal always in this small area, so I placed the lamppost on top of it.  


I sometimes like things pared-down and simple, so to avoid things being over-the-top, I decided to use a very simple garland of greenery adorned with red ribbons around the door. To see how to make this garland, visit the post in my blog The Crafting Table by clicking here.


Here is the whole look. 


Finally, at either side of my driveway, I removed my garden lantern from its post,


and hung my handmade poinsettia pomander in its place. To view how to make this ornament, visit the post on my blog The Crafting Table by clicking here


Being that recently I changed the color scheme inside of my house to cool blues, silver, and grey, I wanted the décor inside of my home to reflect the same theme.  

The first thing I decided to do is adorn each of the bedroom doors in my house with a festive wreath.  First, I measured the door and placed a small mark with a thumbtack right in the middle of the door.
I used the mark as a guide and placed these simple hangers made by command.  What I like most about these is the ease of removal.


All set!


Next, I decorated my bookshelf.  I draped a simple garland around the pole and down both sides; 


and in each corner I hung a silver bell ornament adorned with two ornaments each, one in blue and one in silver to match the theme of my tree. 


I placed a small wreath with a few hanging ornaments and a silver bell ornament in the middle of the shelf. 


On to the fun part!!  Trimming the ole Christmas tree.  First, I decided where I wanted set up the tree.  This corner in my entryway looked friendly. 


 After I decided to place the tree in the foyer, I laid down a foundation of artificial snow.


I began trimming the tree by flocking the tree with artificial snow.  Using a circular motion as I sprayed helped the snow adhere more evenly.


The next step was stringing my lights.  There are several methods for stringing lights, but over the years, I've found that the best way to do it is to use these type of lights. These lights have the standard rope, but with long-limbed strands of lights as well.  


These really make it easier to stagger lights throughout your tree, rather than draping lights up the tree in a swirl fashion. The overall effect is a tree with lights throughout. 


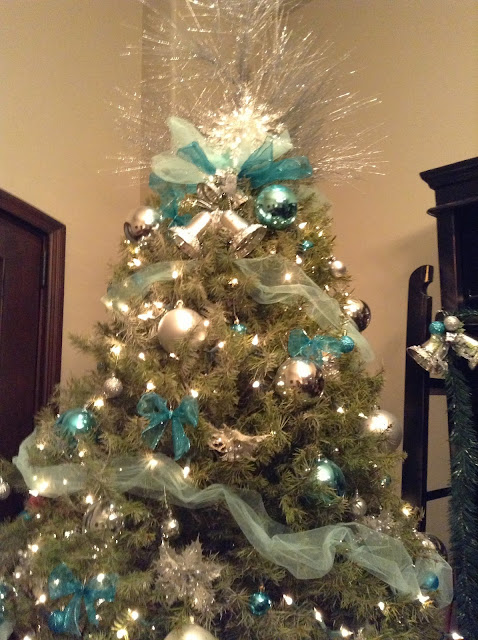
After the lights were strung, I threaded light blue tulle fabric throughout the tree.  I like to use tulle in lieu of a traditional garland, because I feel it is a better way to showcase the color palette. 


Next, I placed the largest bulbs in sporadic places.  Shown here.


In between the larger bulbs, I placed smaller bulbs. 


Next, I placed these snowflake sprays.  I love these; they add a whimsical, wintery effect.  


I also used the blue ribbon to make several small bow ornaments; simply tie a bow and thread with an ornament hook, close the hook onto the bow.  


Finally, I placed my hand-built tree topper.  If you would like to view the tutorial for this topper, you may see the post on my other blog, The Crafting Table, by clicking here

To give the tree an elevated effect, I draped a small table with a wintry tablecloth, placed the tree on top; and finally, added this lovely tree skirt.


The finished look:  


Here is a look up close. 


If you enjoy this post, please visit the archives!  You may also visit my full profile to view my other blogs. Connect with me on my Facebook Page, Parsimonious Décor Darling.   You might like to visit my other blog hubs,

The Marvelous Maison, a lifestyle blog hub and 
Frugal Fab Fashionista, my fashion blog hub. 

Follow me on Pinterest!!  Please be sure to kindly follow the board guidelines, as it takes time and effort to find fabulous pins across the Internet and Pinterest!  Thank you!  

Thank you for stopping by! ❤


Saturday, December 7, 2013

Creating an Eclectic Dining Area

Hello, friends!  Thank you for visiting my blog.

If you are an artsy type like I am, you truly want your space to reflect your personality.  Being that I am absolutely OBSESSED with do-it-yourself projects, (good grief, you should see my Pinterest boards), I have always had a love of eclectic styles.  Today's post will reflect how I created an eclectic dining area. 


When recently redoing my dining area, I wanted it to look classic, but also have European elements which are true to the Mediterranean style of my little house. Choosing different chairs and décor that share some elements of commonality assures your design will be cohesive not only with the rest of your home, but with itself.

First, I chose a color scheme.  My favorite color has always been blue.  I just love how calming, cool, and refreshing it is.  I picked up some English and antique chairs; I reupholstered them (tutorial here) in this lovely striped fabric. The fabric I chose was not overly busy; but combined the elements of blue and a silvery neutral tone, which is the other main color I chose.


The walls in my home are a light taupe, so in this particular area, I painted the wall a darker neutral as an accent color.  Here is the contrast.


Next, I placed this dark cabinet to house my dishes. I love that this cabinet has very clean lines, but also an elegant molding on the top which makes it less modern and more French Country.  It reminded me of an antique French Bibliothèque furniture piece, which I adore, so it was exactly what I was looking for.

Here is a closeup. I also appreciated the rubbed antique look of the wood.


I chose white and silver as accent colors in this setting, because I wanted a striking pop of color against the dark wood floors and the dark cabinets.  To achieve that, I placed my handmade high-back bench.  When I first began this project, I wanted a highback bench, but found that they were extraordinarily expensive.  I even considered placing a leather English Chesterfield sofa at the table which would also double as a dining chaise, but in the end, I opted for a handmade highback bench.  To view the tutorial, you may visit the post in the archives by clicking here


Next, I chose this lovely table.  This table is just wonderful because it has the rustic appeal of the planks, yet it varnished in such a way so it appears slightly shiny.  The shine on the table emulates a more classic feel...had it not been so, the table would be much more of a country table; and wouldn't quite mesh with my classic-meets European Country idea.   


I chose to place these lovely damask chairs at the head and foot of the table.  I love that these chairs are a silvery-grey and I adored the intricate scrolling of the French damask pattern. 


Finally, I added these large floral arrangements.  I chose these because the bench was white, and the hardware of both the bench and chairs was silver.  Placing these large silver vases directs the eye and pulls out these elements in the other pieces; and the taupe-accented white foliage with dark branches really does the same for the table and floors in my home.


From my collection:
Extending table, Pottery Barn Cortona Collection
Sliver-grey damask chairs, Cynthia Rowley; from HomeGoods
Large vases and white foliage, ZGallerie
Dark Cabinets, Tai Pan Trading


If you enjoy this post, please visit the archives!  You may also visit my full profile to view my other blogs. Connect with me on my Facebook Page, Parsimonious Décor Darling.   You might like to visit my other blog hubs,

The Marvelous Maison, a lifestyle blog hub and 
Frugal Fab Fashionista, my fashion blog hub. 

Follow me on Pinterest!!  Please be sure to kindly follow the board guidelines, as it takes time and effort to find fabulous pins across the Internet and Pinterest!  Thank you!  

Thank you for stopping by! ❤