

PART ONE:
My next project.....a daunting task. I somehow convinced myself I could transform an old headboard into a dining banquette. I found this headboard for $45 at a local thrift.

I began by deconstructing and inverting the headboard so that the posts would now become the legs of the bench.


I found a great chair with beautiful French legs at my local Goodwill for $15

Seek and destroy.......

Using the existing brackets, L brackets ($0.69), wood from a pallet (free) and muscles from a wonderful hubby, she began to take shape.

Another angle......

Giving her wings........
Plywood from a local hardware store $11.00
I used the curves of the headboard to make a template on paper. The hubby helped with the cutting......

The bones of my bench are complete. I removed part of the original post so the bench would be level.

Sand, sand, sand.

And more.........

Finally. Ready to stain.

Staining I have to say was an arduous task. It took several coats to get the desired effect.

For the cushion in the headrest, I used three inch thick foam. For the seat, I used four inch. I bought all of the foam from Joann's during a huge winter clearance at 50% off. I paid approximately $100 for all of the foam and batting. The stain was $9.00
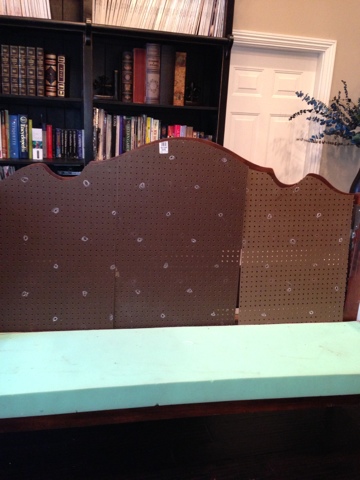
Using pegboards (about $24), I laid the bench down and drew a template. You may opt to use a single pegboard large enough rather than how I've used three here. I feel using smaller ones were easier to work with.
Tracing......


After the cutting was done (thank you honey!), I made sure it was pretty accurate before deciding where I wanted to place tufts.

I used chalk to draw out where I wanted the tufts. There is an excellent tutorial on www.apartmenttherapy.com about this whole process. I waffled back and forth between a diamond pattern and straight.
Here is straight

After taking a small consensus of family and friends, I decided on the diamond pattern.
Once I drew all the areas to be tufted, I laid the pegboard on the foam and used spray adhesive to attach the foam to the board. The spray adhesive cost approximately $5

Once dry and firmly attached, I began cutting away the foam. I initially used an exacto; however, it was taking forever. I opted for my gardening/pruning shears instead.... they worked much better.


Next, I began poking the holes out where my tufts would be. In the tutorial on Apartment Therapy, a drill was used. I found a Phillips screwdriver much more effective. It removes the whole plug of foam with little to no effort. When I tried using the drill, I found sometimes the foam would get caught up on the drill bit.

Ready for tufting....I used a waxed hemp thread and generic buttons costing me approximately $10. I purchased my fabric from Joann's, this time using a discount I found online. There were two vinyls used; a very supple leather-like one, and a very sturdy marine vinyl. The most expensive part of my project was the fabric (faux leather, wink wink). I also purchased some batting. The cost was about $200 total.

Close.......

Closer.....

Almost there.....

Tufting: Done!!!

The reverse side.....lots of buttons.
:)

Next, I covered my wings with the batting.

PART TWO:
I began the initial work on the bench portion. First, I used the spray adhesive to attach foam to the front of the bench (with little ones about, I need it).

Next, I covered the bench with the cheaper (and matching) marine vinyl (included in the $200 fabric cost). Using a staple gun I had at the house (you can buy one for about $20) and staples ($2.50), I attached the vinyl, carefully following along the bench.

Here is the result.

The underneath. A hot mess stapled upside down [no one will see it. ;) ] You may opt to add black cambric to cover any flaws, but I didn't, because I intended to use the bench in the dining room (and food would likely get trapped, ick), so I left it open for easier cleaning.

I trimmed the area around the legs and stapled the other part beneath.

I carefully glued the excess vinyl using spray adhesive.

I created a fold by first gluing the vinyl while it was in an upward position, and allowing dry time.

Once dry, I glued the vinyl onto itself.

Here is another look.

Next, I covered my wings. I drew a template on the leather-like vinyl, then cut it to size. I used the staple gun to attach it.

Next, using the cutout for the other side of the vinyl, I folded it, and carefully placed it over the staples to create a seam. I then nailed this down using upholstery nailhead trim.

This trim is very easy to use. It comes in a 5 yard roll. It cost me $22.00 per roll. I used approximately one and one half rolls to complete this project.

Here it is, one side completed. Repeat the process.

I stapled the bottom portion only of the tufted fabric to the pegboard.

After I stapled the bottom portion only of the headrest fabric to the pegboard, I lined up the headboard and attached it. I gently pulled down the foam and screwed the pegboard headboard to the original one.

There's something to be said about pre-drilling your holes. Less work. ;)
I used a drill bit smaller than the diameter of the screw, ensuring a tight fit. You can also use a Phillips drill bit and use the drill to drill in the screw, but because of the small size of these, I did it the other way. I used lath screws that were shorter than the width of the original headboard with heads that were larger than the holes of the pegboard.

All attached. These are small but mighty. I screwed in several places, following the parameter of the pegboard headboard.

When I made the covers for the wings, I didn't nail or staple them down on the back end. This is will become important in the next couple of steps.

Next, using some leftover foam from my blue chairs (see post here) I filled the void between the wing and the headboard.

Using the excess fabric on the sides of the pegboard/headboard, I tucked it over the foam and stapled it down. I pushed as hard as I could to get it as close as possible to the wing.

I then tucked the remaining fabric into the wing, creating a faux seam/seamless finish.

Improvising is what I love to do. To drive the difficult-to-reach staples into the wood, I used my steel knife sharpener from my kitchen and a hammer.

Using the excess from the top, I pulled and folded.....

And stapled it down, creating a seam.

Next, I laid batting over the back curves.

If you note, when I started, the original headboard bottom was cubic. Now that this is on top, I stuffed batting inside to cover the point and make it appear smooth. Once I did that, I stapled the headboard down, following the curves.

Where there were peaks, I used very small nails because I found that the staples weren't strong enough.

All attached!!

Next, trim off the excess.

Here she is from the front.

PART THREE:
Third and final stage....at last!
Where I pulled, folded, and stapled, I finished hammering down the nailhead trim.

Taking a cue from my (store-bought) dining chairs, I decided to create a seam. I began by using the original piping from the french chair.

Here it is after fabric was removed.

It wasn't quite long enough. Unluckily (but luckily) for me, in the interim of completing this project, I needed to replace my IPhone charger because it stopped working. The cords were almost the same in diameter.

I cut the cord, and fused the two using a thin piece of black electric tape.

I cut an extra long piece of fabric. I laid the piping down. Using my trusty brother machine, I created the seam.

That is one loooong piece of piping!!

Now that the seam is complete, I attached it over the other existing staples along the back of the bench.

Following the back......

More....

The whole length of the back.


I next cut the foam cushion to size.


I thought it didn't look quite right, so I added a little one-inch extension using the spray adhesive. Here is where I enlisted the help of that same wonderful, mechanically inclined hubby of mine. He drew a template of my Frankencushion by tracing it with a fabric pen.

And, carefully cut and sewed each piece.


More intricate sewing from manly hands.....

With all the pieces sewn, place batting around the cushion.....

Carefully fold over,

And into place.

Tuck enough batting inside to fill up any gaps.

Repeat the same process on the opposite side. Once complete, using the same fabric pen, make a mark where your bottom seam should go.

I completed the cushion, but noticed it was turning up in the corners when sat upon, so I decided to place a very thin piece of wood inside for support. We had some at the house for another project I was completing. I think it cost around $7. I laid the cushion down, and drew a template.

I cut the wood with a jigsaw, carefully following the lines.

Once cut, I carefully fit the cushion into the sleeve along with the wood on bottom. I created some tension by pulling tight and stapling the fabric down.

I then put glue into the gaps.

Using the backside of a butter knife, spread the glue into a thin layer. I did this step deliberately after stapling. You will need to staple first to create tension and ensure a tight fit.

We are in the home stretch now.....

Here is a close up of the cushion work.

Next, I decided I didn't really care to see the folded seam around the legs, so I hammered down some nailhead trim.

Next, I stapled down batting to fill in and cover the back.

I tipped her over and draped.....
Stapled and trimmed.


Next, using the less expensive more sturdy marine vinyl, I covered the back by carefully folding over.....

And using nailhead trim to hold in place.

After I closed, there were some wrinkles, so I added a little more batting to the back. Here is what it looked like before and after.


After completing the trim along the top, I stapled the final piece to the bottom.

Finally; I cleaned up with a Mr. Clean magic eraser, removing all residual dirt and adhesive (lots of that on there when I purchased it).


Another angle.....

Thank you so much for visiting, and if you'd like, you may watch the slideshow video below!
My next project.....a daunting task. I somehow convinced myself I could transform an old headboard into a dining banquette. I found this headboard for $45 at a local thrift.
I began by deconstructing and inverting the headboard so that the posts would now become the legs of the bench.
I found a great chair with beautiful French legs at my local Goodwill for $15
Seek and destroy.......
Using the existing brackets, L brackets ($0.69), wood from a pallet (free) and muscles from a wonderful hubby, she began to take shape.
Another angle......
Giving her wings........
Plywood from a local hardware store $11.00
I used the curves of the headboard to make a template on paper. The hubby helped with the cutting......
The bones of my bench are complete. I removed part of the original post so the bench would be level.
Sand, sand, sand.
And more.........
Finally. Ready to stain.
Staining I have to say was an arduous task. It took several coats to get the desired effect.
For the cushion in the headrest, I used three inch thick foam. For the seat, I used four inch. I bought all of the foam from Joann's during a huge winter clearance at 50% off. I paid approximately $100 for all of the foam and batting. The stain was $9.00
Using pegboards (about $24), I laid the bench down and drew a template. You may opt to use a single pegboard large enough rather than how I've used three here. I feel using smaller ones were easier to work with.
Tracing......
After the cutting was done (thank you honey!), I made sure it was pretty accurate before deciding where I wanted to place tufts.
I used chalk to draw out where I wanted the tufts. There is an excellent tutorial on www.apartmenttherapy.com about this whole process. I waffled back and forth between a diamond pattern and straight.
Here is straight
After taking a small consensus of family and friends, I decided on the diamond pattern.
Once I drew all the areas to be tufted, I laid the pegboard on the foam and used spray adhesive to attach the foam to the board. The spray adhesive cost approximately $5
Once dry and firmly attached, I began cutting away the foam. I initially used an exacto; however, it was taking forever. I opted for my gardening/pruning shears instead.... they worked much better.
Next, I began poking the holes out where my tufts would be. In the tutorial on Apartment Therapy, a drill was used. I found a Phillips screwdriver much more effective. It removes the whole plug of foam with little to no effort. When I tried using the drill, I found sometimes the foam would get caught up on the drill bit.
Ready for tufting....I used a waxed hemp thread and generic buttons costing me approximately $10. I purchased my fabric from Joann's, this time using a discount I found online. There were two vinyls used; a very supple leather-like one, and a very sturdy marine vinyl. The most expensive part of my project was the fabric (faux leather, wink wink). I also purchased some batting. The cost was about $200 total.
Close.......
Closer.....
Almost there.....
Tufting: Done!!!
The reverse side.....lots of buttons.
:)
Next, I covered my wings with the batting.
PART TWO:
I began the initial work on the bench portion. First, I used the spray adhesive to attach foam to the front of the bench (with little ones about, I need it).
Next, I covered the bench with the cheaper (and matching) marine vinyl (included in the $200 fabric cost). Using a staple gun I had at the house (you can buy one for about $20) and staples ($2.50), I attached the vinyl, carefully following along the bench.
Here is the result.
The underneath. A hot mess stapled upside down [no one will see it. ;) ] You may opt to add black cambric to cover any flaws, but I didn't, because I intended to use the bench in the dining room (and food would likely get trapped, ick), so I left it open for easier cleaning.
I trimmed the area around the legs and stapled the other part beneath.
I carefully glued the excess vinyl using spray adhesive.
I created a fold by first gluing the vinyl while it was in an upward position, and allowing dry time.
Once dry, I glued the vinyl onto itself.
Here is another look.
Next, I covered my wings. I drew a template on the leather-like vinyl, then cut it to size. I used the staple gun to attach it.
Next, using the cutout for the other side of the vinyl, I folded it, and carefully placed it over the staples to create a seam. I then nailed this down using upholstery nailhead trim.
This trim is very easy to use. It comes in a 5 yard roll. It cost me $22.00 per roll. I used approximately one and one half rolls to complete this project.
Here it is, one side completed. Repeat the process.
I stapled the bottom portion only of the tufted fabric to the pegboard.
After I stapled the bottom portion only of the headrest fabric to the pegboard, I lined up the headboard and attached it. I gently pulled down the foam and screwed the pegboard headboard to the original one.
There's something to be said about pre-drilling your holes. Less work. ;)
I used a drill bit smaller than the diameter of the screw, ensuring a tight fit. You can also use a Phillips drill bit and use the drill to drill in the screw, but because of the small size of these, I did it the other way. I used lath screws that were shorter than the width of the original headboard with heads that were larger than the holes of the pegboard.
All attached. These are small but mighty. I screwed in several places, following the parameter of the pegboard headboard.

When I made the covers for the wings, I didn't nail or staple them down on the back end. This is will become important in the next couple of steps.
Next, using some leftover foam from my blue chairs (see post here) I filled the void between the wing and the headboard.
Using the excess fabric on the sides of the pegboard/headboard, I tucked it over the foam and stapled it down. I pushed as hard as I could to get it as close as possible to the wing.
I then tucked the remaining fabric into the wing, creating a faux seam/seamless finish.
Improvising is what I love to do. To drive the difficult-to-reach staples into the wood, I used my steel knife sharpener from my kitchen and a hammer.
Using the excess from the top, I pulled and folded.....
And stapled it down, creating a seam.
Next, I laid batting over the back curves.
If you note, when I started, the original headboard bottom was cubic. Now that this is on top, I stuffed batting inside to cover the point and make it appear smooth. Once I did that, I stapled the headboard down, following the curves.
Where there were peaks, I used very small nails because I found that the staples weren't strong enough.
All attached!!
Next, trim off the excess.
Here she is from the front.
PART THREE:
Third and final stage....at last!
Where I pulled, folded, and stapled, I finished hammering down the nailhead trim.
Taking a cue from my (store-bought) dining chairs, I decided to create a seam. I began by using the original piping from the french chair.
Here it is after fabric was removed.
It wasn't quite long enough. Unluckily (but luckily) for me, in the interim of completing this project, I needed to replace my IPhone charger because it stopped working. The cords were almost the same in diameter.
I cut the cord, and fused the two using a thin piece of black electric tape.
I cut an extra long piece of fabric. I laid the piping down. Using my trusty brother machine, I created the seam.
That is one loooong piece of piping!!
Now that the seam is complete, I attached it over the other existing staples along the back of the bench.
Following the back......
More....
The whole length of the back.
I next cut the foam cushion to size.
I thought it didn't look quite right, so I added a little one-inch extension using the spray adhesive. Here is where I enlisted the help of that same wonderful, mechanically inclined hubby of mine. He drew a template of my Frankencushion by tracing it with a fabric pen.
And, carefully cut and sewed each piece.
More intricate sewing from manly hands.....
With all the pieces sewn, place batting around the cushion.....
Carefully fold over,
And into place.
Tuck enough batting inside to fill up any gaps.
Repeat the same process on the opposite side. Once complete, using the same fabric pen, make a mark where your bottom seam should go.
I completed the cushion, but noticed it was turning up in the corners when sat upon, so I decided to place a very thin piece of wood inside for support. We had some at the house for another project I was completing. I think it cost around $7. I laid the cushion down, and drew a template.
I cut the wood with a jigsaw, carefully following the lines.
Once cut, I carefully fit the cushion into the sleeve along with the wood on bottom. I created some tension by pulling tight and stapling the fabric down.
I then put glue into the gaps.
Using the backside of a butter knife, spread the glue into a thin layer. I did this step deliberately after stapling. You will need to staple first to create tension and ensure a tight fit.
We are in the home stretch now.....
Here is a close up of the cushion work.
Next, I decided I didn't really care to see the folded seam around the legs, so I hammered down some nailhead trim.
Next, I stapled down batting to fill in and cover the back.
I tipped her over and draped.....
Stapled and trimmed.
Next, using the less expensive more sturdy marine vinyl, I covered the back by carefully folding over.....
And using nailhead trim to hold in place.
After I closed, there were some wrinkles, so I added a little more batting to the back. Here is what it looked like before and after.
After completing the trim along the top, I stapled the final piece to the bottom.
Finally; I cleaned up with a Mr. Clean magic eraser, removing all residual dirt and adhesive (lots of that on there when I purchased it).
Here she is in my dining room.
Another angle.....
Foyer/Entry Area


This has been an enjoyable journey. Hindsight is always 20/20. One thing I would definitely recommend is to put batting on the foam prior to tufting. That will fix and smooth some of the puckering you see on my tufts. I began this project because I wanted to redo the dining area of my house. I thought it would look really pretty with a highback banquette or chesterfield sofa. I could not find a bench large enough for my fairly large table for under $4,000. This being my first foray into bench (furniture?) making, I made out pretty well for those of you who are counting. The whole project cost me just under $500; mostly because of the fabric choices. It can likely be done much more inexpensively using other materials.
This has been an enjoyable journey. Hindsight is always 20/20. One thing I would definitely recommend is to put batting on the foam prior to tufting. That will fix and smooth some of the puckering you see on my tufts. I began this project because I wanted to redo the dining area of my house. I thought it would look really pretty with a highback banquette or chesterfield sofa. I could not find a bench large enough for my fairly large table for under $4,000. This being my first foray into bench (furniture?) making, I made out pretty well for those of you who are counting. The whole project cost me just under $500; mostly because of the fabric choices. It can likely be done much more inexpensively using other materials.
Thank you so much for visiting, and if you'd like, you may watch the slideshow video below!
If you enjoy this post, please visit the archives! You may also visit my full profile to view my other blogs. Connect with me on my Facebook Page, Parsimonious Décor Darling. You might like to visit my other blog hubs,
The Marvelous Maison, a lifestyle blog hub and
Frugal Fab Fashionista, my fashion blog hub.
Follow me on Pinterest!! Please be sure to kindly follow the board guidelines, as it takes time and effort to find fabulous pins across the Internet and Pinterest! Thank you!
Thank you for stopping by! ❤
Very impressive! I will try to tackle this as a project during my vacation over the Labor Day holiday! :D
ReplyDeleteThank you!! Please stay tuned....I will be doing another bench in a few months, this time with hindsight on my side. ❤❤
ReplyDeletehow long did the entire project take yoU?
ReplyDeleteIt took a while because most of the work was done in the early hours as my little ones were sleeping. :)
ReplyDeleteI'd say cumulatively, it took about 3-3 1/2 hours total. Thank you for the inquiry!
Wonderful! Very impressive. Thank you for all the photos and explanations. Made it very easy to follow along.
ReplyDeleteThank you for visiting!!
DeleteWow, what an amazing project and a great tutorial. I featured this on my Link Party Features Board on Pinterest. Thank you for sharing this at History & Home this week, take care - Dawn @ We Call It Junkin.com
ReplyDeleteThank you, Dawn! I appreciate it! ❤❤
DeleteHoly. labor. intensive. If I'd tried this project, I NEVER would have finished it….so good on ya girl! It turned out beautifully!
ReplyDeleteFound you on we call it junkin's linkup!
ash@sn4g
http://shabbynot4gotten.blogspot.com
Thank you. :)
DeleteGirl Power!
I saw your link on "the Scoop" and all I can say about your bench is...completely stunning! Okay, maybe that's not all. You're fearless and talented :)
ReplyDeleteThank you!
DeleteAmazing!! I am awful at building things but this is crazy good. I love that you thought outside of the box and created something beautiful.
ReplyDeleteVictoria
troispetitesfilles.blogspot.com
Thank you so much, Victoira!
DeleteFantastic! I would love it if you joined and contribute your awesome posts at my link party at City of Creative Dreams, starts on Fridays :D Hope to see you there at City of Creative Dreams Link Party.
ReplyDeleteThank you for the invite, I'll be there next week! :)
DeleteVery classy! Your hard work paid off. Thanks for sharing at the Best of DIY link party.
ReplyDeleteThank you so much, and thank you for hosting!!
DeleteThank you, Robin! Thank you for hosting!
ReplyDeleteSuch an informative tutorial with stunning results! Thanks so much for sharing @Vintage Charm! Blessings, Cecilia
ReplyDeleteThank you, Cecelia!!
Delete