
I have always admired garden spaces resplendent in either tradition or romance:
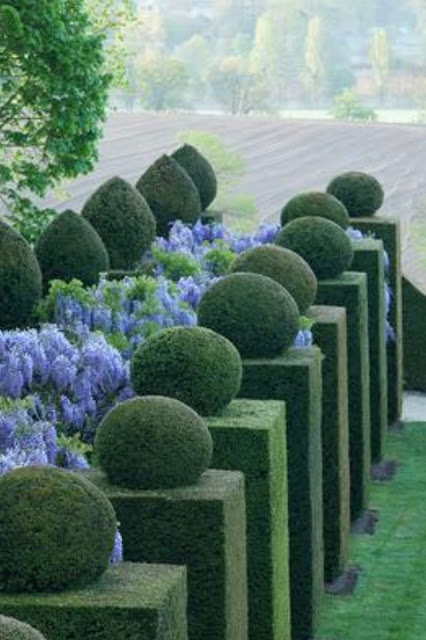
Traditional gardens of meticulously maintained topiary, Levens Hall. Photo via VisitCumbria.com
 Château de la Ballue Garden. Photo via the European Garden Heritage Network
 Levens Hall. Via The Levens Hall Garden Gallery.


or fantastic French parterre gardens that enchant with verdant allure.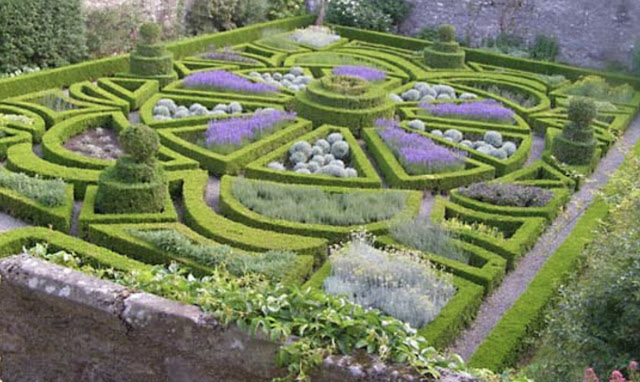

Parterre garden at Bodysgallen Hall, Wales. Photo via Britannica.com
Beautiful and whimsical English-style gardens full of charm:
Mixing the gracious splendor Mother Nature has to offer.
Climbing flowers dripping off of trellises. Beautiful "Strawberry Hill" climbing roses. Via David Austin Roses EU
Rambling, fragrant gorgeousness growing along bucolic fences and spilling untamed in their unabashed glory over walls.
Wonderful garden follies full of old-world appeal. Capel Manor Garden Folly, photo via Wikimedia Commons.
Layered gardens that delight the senses with fantastic color; truly a feast for the eyes!
Most gardens are a labor of love that take years to master, complete, and maintain. For the DIY-home gardener, it is an arduous exercise in trial and error. I am an impatient one in this regard, specifically because it is very, very hot where I live and the Summers are quite near arid. The soil is terribly hard, rocky, full of clay, and a lot of folks opt for succulent gardens (which sorry to say, I low-key abhor, lol!). When planning my outdoor space, I wanted to combine my love of the romantic as well as the traditional by incorporating a little bit of both old-world charm and streamlined meticulousness.
The area where I added the furniture and small fireplace was slowly coming together, but still looked somewhat barren and incomplete.
As previously stated, I first added my DIY Versailles-style planter you see on the right. I still felt the area was missing something.
By adding some potted pretties along with faux greenery, the space really began to take shape.
To make a faux ivy wall, you will need several panels of faux grass. I purchased mine from the 99¢ Store, although you can likely also purchase them in bulk online. At the local 99¢ Store where I found mine, they usually have stock every Spring, even with flowers!

You will also need:
2X4 wood stud sections
Saw for cutting
Nail gun and nails
Faux grass roll (optional)
Staple gun and staples
Garden or florist twine in green
Begin by building a stand, with staggered studs/beams.
Use two by fours as footing.
Next, you will drape the faux grass roll onto the stand, pulling it taut, using the staple gun to staple it into place on the reverse side. You may opt to skip this step if you prefer, but because portions of the fake grass sections can be slightly see-through, I added the roll of fake grass first for a more cohesive look...and in essence, building a grass accent wall.

Continue until completely covered.


Pretty planters:
Once the faux grass roll is stapled (tightly) into place, use the staple gun to staple the faux grass sections over it. Staple them directly to the staggered wood hidden beneath the faux grass. I used the green twine to attach the separate sections to each other, especially on portions where there is no wood beam to adhere to, making them much more secure.


The finished grass wall:

You will note I added a glass mirror as an accent. I go into more detail about it here.

A while back, at a local statuary/nursery, I came across these beautiful extra large planters. I was immediately drawn to their ornate detail, the beautiful bronze, and the simulated patina.

Closeup.

I simply used some premixed enriched soil:

filled the pot about 3/4s full: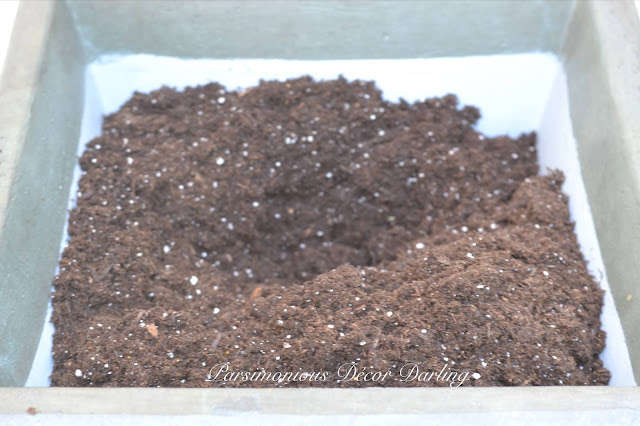

Then added some pretty blooms. Geranium seem to do very well in the California heat, and although they are not fragrant in a good way...they come off very pungent to me; they are aesthetically pleasing.

Closeup.

A planter was placed at the side of each sliding door.


Trellises were added to each pot along with fragrant, climbing jasmine. Jasmine, unlike the geranium, smells beautiful and is such a delight for the senses!!


Next, I added a row of raised garden urns on plinths down the path near the wall of the garden.
Before:

So bland!!
I found this adorable stone garden urn at my local Lowe's, for less than $30!! You can find them here.


Each planter was placed on a column plinth

and I planted small boxwood balls in each along with trellising/weeping vines.

To each, I added a small solar-powered lantern.
So. Much. Better.


Next, I added flowers to this lovely fluted planter I'm pretty sure I found at Lowe's as well.

They no longer sell this model at Lowe's,


The wall has held up fabulously over the last couple of years, requiring me to restaple here and there only sporadically. The funny thing is, on a recent jaunt to Lowe's, I found they now sell their own trellis with faux foliage. I am considering changing these out to those, because they may require even less maintenance. They appear a little sturdier. They are quite pretty:

What I like is the base is hardier and likely easier to nail or staple down, and it covers a much larger area.
Do you “cheat” in your garden, or are you blessed with enviable circumstances with which to cultivate with ease? ☺️
If you enjoy this post, please visit the archives! You may also visit my full profile to view my other blogs. Connect with me on my Facebook Page, Parsimonious Décor Darling. You might like to visit my other blog hubs,
The Marvelous Maison, a lifestyle blog hub and
Frugal Fab Fashionista, my fashion blog hub.
Follow me on Pinterest!! Please be sure to kindly follow the board guidelines! Thank you!
Thank you for stopping by! ❤