Saturday, July 15, 2017

A Simple Summertime Tea for One


Sometimes, pleasure can be found in the simplest of things.  A tiny mason jar full of pretty little blooms freshly picked from the garden.


Aren't these sweet?


A cheerful little teapot with flowers indicative of the beauty of Summer...


paired with a beautiful cup of freshly brewed lavender tea.


I love the subtle gilding on the rim of the cup and top of the teapot.  So delicate.  The two are from different makers, but they play quite nicely together.  ;-)


To make Lavender tea, simply steep culinary lavender in a tea infuser.  It can be done in the pot or cup.  I enjoy the tea with a splash of lemon, and a tiny bit of honey and sugar.


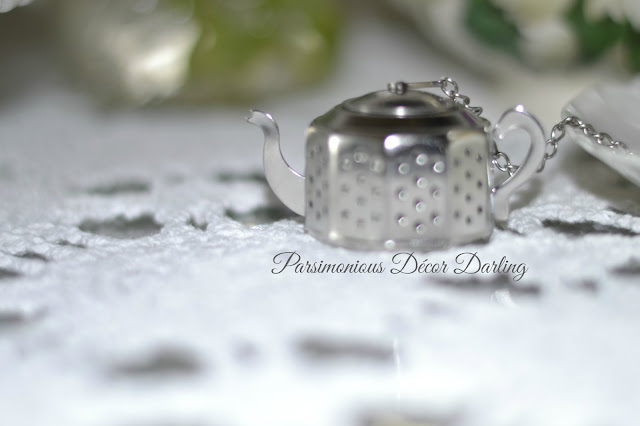
The lavender tea was steeped in this darling little teapot infuser.  So cute!


The tea was quite lovely with a slice of my Nue Gâteau au Citron avec Infusion des Raisins Blancs, set here on a miniature fluted cake plate.


If you would like to view the recipe for my Nue Gâteau au Citron avec Infusion des Raisins Blancs (Naked Lemon Cake with White Grape Infusion), you may do so by visiting the post on my blog Parsimonious Pabulum by clicking here.


These light flavors are delicate and just right for a warm Summer day.


I hope you all are enjoying the beautiful weather!


Until next we meet...


From my collection:

Floral teapot, Sadler for Royal Windsor, Duchess Pattern; local antique
Mini cake plate, Ralph Lauren Pavilion
Coffee/tea mug, Royal Heritage England no. 8; local antique
Stainless Steel Teapot tea Infuser, Cost Plus World Market
Mini fork and teaspoon, Grace's TeaWare
Crochet topper, Local antique


If you are a tea enthusiast like I am, please join me and other lovely bloggers at Bernideen's Tea Time Cottage and Garden for a blog hop in honor of Afternoon Tea Week.  The Celebration will begin on August 16, and we would love to see you there!


If you enjoy this post, please visit the archives!  You may also visit my full profile to view my other blogs. Connect with me on my Facebook Page, Parsimonious Décor Darling.   You might like to visit my other blog hubs,  

The Marvelous Maison, a lifestyle blog hub and 
Frugal Fab Fashionista, my fashion blog hub. 

Follow me on Pinterest!!  Please be sure to kindly follow the board guidelines, as it takes time and effort to find fabulous pins across the Internet and Pinterest!  Thank you!  

Thank you for stopping by! ❤


Friday, July 7, 2017

Mirror in the Bathroom


Hello, friends!!  I hope you are all having a fabulous Summer!

A little bit ago, while on one of my infamous jaunts through antiquity and curiosity via locality, I came upon a wonderful gilded mirror.


I was immediately attracted by its ornate detail and impressive heft.  It was definitely a statement piece.


So gorgeous!!


ALAS...


There was but one wee problem. 

I am typically not a huge fan of gilded gold.  I usually prefer the understated elegance and calm of cool silver, and when I want something exuding warmth, it is usually a beautiful oil-rubbed bronze.


Our little casita is a Spanish Colonial Revival, or at least that is how we have styled it; yet the aesthetic inside is what I like to refer to as European Hodgepodge.  There are Spanish, French, Italian, and English Country elements, all of which lend to a home that is comfortable and cozy with a sort of old world charm.


A while ago I shared in this post how to add fabric to your walls using starch.


Well, while I was on hiatus last year, I repeated the process in another powder room, which is the guest powder room.  This time, I decided to go with a warm damask which incorporated all of the colors in the home.  Here is a look at the fabric.  Isn't it fab!?  I had 'interviewed' several, and none of them spoke to me until this one.


When the walls were barren, Mr. Parsimonious picked up a mirror.  While the color was fine, this mirror looked much more African Safari or British Colonial than Old World.  It wouldn't work with the new damask fabric.  Quel dommage!!


When I started blogging, I shared in this post how I made over another thrifted mirror.


Utilizing the same process, I stained the new mirror, but this time, I used an oil rubbed bronze antiquing glaze by Valspar sold by Lowe's.


I decided I didn't want to deplete all of the gold completely, but have it act as an accent of the piece.  Therefore, I didn't cover the mirror in an opaque fashion as I had done previously, and I used a much lighter hand. 


I made sure to apply glaze into the little crevices, and on the higher points, I wiped the glaze back off.


Here is a side-by-side comparison.  This mirror now is much more to my liking.  It doesn't shout, "HELLLLLOOOO, NOTICE ME!!! I'M GOOOOOLLLLLD!!!"  Now, it is much more elegant and less gaudy; it doesn't look like inexpensive faux plastic, and the gold is instead a fine detail of what now looks like something much older.


Doesn't this look like it has always belonged in this powder room!!?


Alongside dainty dancers,


the beautiful damask,


an antique stone toothbrush receptacle, a (DARLING!) monogrammed towel, and lavender;


it is now also much more complimentary to the stone architectural elements,


oil rubbed lighting, sink, 


and other elements of the powder room.  It becomes a perfect melding of Old World rustic charm and pretty.


What is your style aesthetic? 

Until next we meet...


If you enjoy this post, please visit the archives!  You may also visit my full profile to view my other blogs. Connect with me on my Facebook Page, Parsimonious Décor Darling.   You might like to visit my other blog hubs,  

The Marvelous Maison, a lifestyle blog hub and 
Frugal Fab Fashionista, my fashion blog hub. 

Follow me on Pinterest!!  Please be sure to kindly follow the board guidelines, as it takes time and effort to find fabulous pins across the Internet and Pinterest!  Thank you!  

Thank you for stopping by! ❤

Saturday, July 1, 2017

Cottage Style Indoor Herb Garden


Hello, friends! 


If you have read my blog (or seen my pinterest boards, for that matter), you know that I am a self-proclaimed epicurean.  While I am nowhere near a professional cuisinère, I love cooking, and I love exploring different types of culinary delights. 


Summertime is a great time for entertaining, and when cooking, there's nothing better than having fresh herbs on-hand and ready for use.  Today I will be sharing how to make a simple cottage-style herb garden for the kitchen countertop or windowsill for less than $20.  I hope you enjoy the post!


You will need:
1 Set three galvanized buckets (flower pots) and tray, I found mine at The 99¢ Store
Modpodge
Burlap fabric or extra-wide burlap ribbon
Spray adhesive
Printer paper
Printer and printer ink
Scissors
Paint brush
Living herbs from the local grocer
Garden soil


First, using a free photo-editing software, create the graphic you want.  I chose to write the names for my herbs in French for a little cottage-y appeal.  I used Picmonkey to create this simple graphic.  Once you have designed your graphic, print. 


Cut the names of the herbs out.


Size the names of the herbs on your piece of burlap or burlap ribbon, and trim to size, leaving the burlap a bit bigger than the name.  If you are using burlap ribbon like I did, you may want to remove the welted edges and unravel a few rows for a bit more rustic appeal.


Spray a minimal amount of the spray adhesive onto your mini bucket, enough for the burlap to adhere to the surface. 


Shown here.


Using the paintbrush, brush a small amount of Modpodge onto the burlap.


Place the paper with the wording centered in the middle of the strip of burlap.  Paint over with the Modpodge.  Allow to dry.  I set mine outside in the 100+ degrees California sun, so they dried quite fast!


Once they have completely dried, Modpodge them again.


So cute.


Now, these are ready for fresh herbs.


Add a small amount of enriched soil to each of your mini buckets, and water the soil.


Gently break apart the roots of your herbs to promote growth. 


Add to your mini buckets.  Top off with soil, and water once more.  Violà!!  It smells like a wonderful Italian restaurant as I am working...mmmm, so good!


This project was so easy, inexpensive, and the herbs taste lovely!  I buy these often, so I thought, why not keep them growing and easily accessible? You may pin if you like this tutorial:


I hope you are enjoying the beautiful summer weather!  Until next we meet...


Ruffled Apron with lace rosette, Jillie Willie, Horchow/Neiman Marcus
Crocheted Tea Towels, Boutross Linens, Horchow/Neiman Marcus


If you enjoy this post, please visit the archives!  You may also visit my full profile to view my other blogs. Connect with me on my Facebook Page, Parsimonious Décor Darling.   You might like to visit my other blog hubs,  

The Marvelous Maison, a lifestyle blog hub and 
Frugal Fab Fashionista, my fashion blog hub. 

Follow me on Pinterest!!  Please be sure to kindly follow the board guidelines, as it takes time and effort to find fabulous pins across the Internet and Pinterest!  Thank you!  

Thank you for stopping by! ❤