Thursday, November 13, 2014

A Christmas Tree in Autumn!?

Hello, Friends!  Thank you for stopping by today!

With Thanksgiving just a short time away (counting the days, literally), I wanted to share one final and überquick post indicative of Autumn.  

Last year, I purchased a couple of faux mini Christmas trees.  One tree was turned into a Halloween tree (see post in the archives here), and the other became a Christmas tree just for my little ones to decorate.  I love to think outside the box, so I thought it might be fun to decorate a tree this year with autumnal details fit for the forthcoming festivities.  I hope you enjoy the post!

I began with this tiny leaf garland.  I love the teeny maple leaf detail.


I chose to use warm colors for the tree, so when I saw these adorable glitter acorn ornaments, I snapped them up immediately!  They just needed hooks.


Next, I made several bow ornaments.


  I laid a shimmery copper ribbon down and cut several strips to size,


and tied them into bows.


I added a hook to each.  Super simple!!


The last thing I added to the tree were some of the little orange ornaments I had made previously.  To see how to make these easy inexpensive ornaments (less than $5 for 44 ornaments), you may visit the post on my blog The Crafting Table by clicking here.


Here he is standing proudly on the table next to my piano in the foyer.


Closeup of the detail.  This is a simple and quick last-minute project to give your home a little Autumn cheer!


Where to buy:
Leaf garland:  Anna's Linens
Acorn and glitter ornaments, Big Lots
Ribbon, The 99¢ Store


If you enjoy this post, please visit the archives!  You may also visit my full profile to view my other blogs. Connect with me on my Facebook Page, Parsimonious Décor Darling.   You might like to visit my other blog hubs,

The Marvelous Maison, a lifestyle blog hub and 
Frugal Fab Fashionista, my fashion blog hub. 

Follow me on Pinterest!!  Please be sure to kindly follow the board guidelines, as it takes time and effort to find fabulous pins across the Internet and Pinterest!  Thank you!  

Thank you for stopping by! ❤


Wednesday, November 12, 2014

Set Your Table With Flair--Gilded Warmth For Thanksgiving


Hello, Friends!!  I appreciate you stopping by to visit today!

I am ecstatic with anticipation for Thanksgiving which is just around the corner!!  There is nothing like Fall for warmth!  Although the temperatures may be cooler, I have always perceived Autumn as warm.  The warm colors of the leaves on trees, a log in the fireplace, and gathering with family....the warmth in our hearts, all lend to this wonderful time of the year. 

Last year, when I was new to blogging, I shared my traditional Thanksgiving Tablescape, which is typically how I set my table each year.  The space in which we gather isn't overly large, yet I quite enjoy it, because it also lends to a feeling of warmth and intimacy.  In today's post, I am going to share a tablescape and a few tips fit for a smaller, even more intimate gathering.  I hope you enjoy the post!

Color Scheme
Choosing a color scheme that exemplifies the season's warmth is the direction I took in today's table setting.  Golds, rustic reds and coppers, oranges, and earthy browns made perfect choices.  I began with a gold tablecloth.  I love the maple leaf motif and the cloth's iridescence, which captures light beautifully.
 

Right in the center of the table, I set glittered maple leaves.  I love these little fellows, they add a little touch of glam and shimmer.
 

On top of the leaves, a traditional woodland stand.


Creating a Multi-dimensional Centerpiece
To create a centerpiece, I chose to use gilded and glittered pieces.  These pieces also capture and reflect light magnificently. 

I placed a large gold pumpkin and copper acorn on the woodland stand,


followed by glittered pumpkins and copper-red candles.


I wove a sparkly brown ribbon down the middle of the table, strategically placing glittered gourds and leaves throughout.
 

Here is a shot of the centerpiece.  Warm, no?


Building The Plate Stack
I began with these lovely rustic-looking chargers.  I love that they almost look like carved wood!


Simple brown chargers


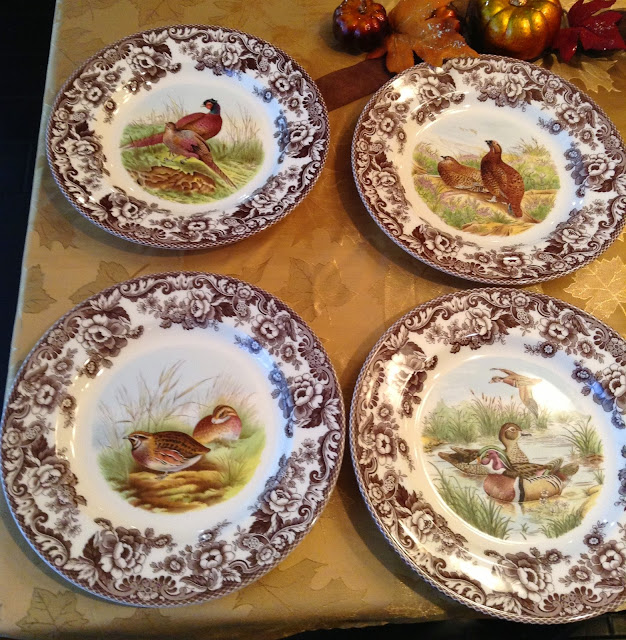
were followed by woodland plates.


I set one each of (shown from left to right)
Pheasant, Red Grouse, Quail, and Wood Duck.


On each plate, I set a copper napkin folded length-wise.  I like the way these napkins play off of the coppers in the centerpiece and leaves of the tablecloth.


A small brown saucer came next,


and to bring in a little more shimmer, I added a sparkly maple leaf to each.


Warm beige napkins with gold capiz shell napkin holders were placed on each setting,


and in each, a glittery autumnal spray.


Final Details

To complete my tablescape, I again chose items that would not only capture light, but exude warmth.

Brown goblets


were followed by crystal wine goblets.  There's nothing like crystal for reflecting light, especially warm candlelight!
 

Finally, I set gold flatware in a traditional manner to complete the setting.
 

Here is the completed tablescape.


A few closeups of the details:


Plate stack:


Thank you for stopping in!!  Enjoy Fall!  :)

From my collection: 

Maple Leaf tablecloth and Napkins, Generic, TJ Maxx/HomeGoods
Rustic Chargers, Pottery Barn
Brown chargers, generic, Hobby Lobby
Traditional Woodland Plates, Spode Woodland Collection, Horchow/Neiman Marcus
Traditional Stand, Also Spode Woodland Collection, Tuesday Morning
Small brown saucers, generic, Tai Pan Trading
Beige napkins, HomeGoods
Gold capiz shell napkin rings, Horchow/Neiman Marcus
Autumnal Sprays, Hobby Lobby
Flatware, Wallace Grand Duchess Collection Horchow/Neiman Marcus
Crystal Wine Goblets, Godinger Dublin Collection, Horchow/Neiman Marcus
Brown goblets, generic
Glitter Acorn, Big Lots
Glitter pumpkin, thrifted painted pumpkin by yours truly
Smaller glitter pumpkin gourds, Ross


If you enjoy this post, please visit the archives!  You may also visit my full profile to view my other blogs. Connect with me on my Facebook Page, Parsimonious Décor Darling.   You might like to visit my other blog hubs,

The Marvelous Maison, a lifestyle blog hub and 
Frugal Fab Fashionista, my fashion blog hub. 

Follow me on Pinterest!!  Please be sure to kindly follow the board guidelines, as it takes time and effort to find fabulous pins across the Internet and Pinterest!  Thank you!  

Thank you for stopping by! ❤


Friday, November 7, 2014

A Simple Fall-Infused Entry


Hello, Friends!  How is your Fall so far?  I hope well.  

Every year as we inch closer to Thanksgiving (likely a favorite holiday, second only to Christmas), I begin vigorously preparing for visiting guests.  I usually start the whole exhausting process about two weeks beforehand.  Call me daffy, but I actually really enjoy having everyone gather at my house for the festivities.  It is stressful, but so worth it!!  We have so much fun!  Sharing food, laughter, thankfulness, reverence, and of course, ending the night with lots and lots of karaoke as a family is pretty much the norm every holiday.   What are your traditions during the holidays?

In honor of the forthcoming holiday, today's post will feature how to create simple welcoming porch décor fit for Thanksgiving. I do hope you enjoy the post!  

I love to have my home look as best as possible when guests visit; this is especially true for the holidays, so I add fresh mulch if the old is faded.  This is part of my 'wintering' the garden which I spoke of earlier this week. 


I began with my little rustic cart.  I usually place this little fellow in the planter, but because I am incorporating fresh fruit along with both fresh and faux flowers, I feel this location will better protect the arrangement from the sun (we are still in the upper eighties and low nineties here in CA, yikes!!).  We don't typically use the left side of my double doors, unless furniture or a Christmas tree is coming inside, and it remains locked most of the time, so I thought it looked like a good spot.  


Inside the cart, I created two platforms by using floral decorating foam and an old pot placed upside down.
 

I just love these cuties in their adorable bushel baskets!!
 

The larger plant went onto the floral foam in the upper right-hand corner, and the smaller went into the lower right.


I picked up a few various cucurbita (latin for gourds),


one being fairly larger than the others, which I set on the upside-down pot.


Behind the larger pumpkin, I stacked a few smaller ones to create a platform, and lastly, for a bit of contrasting color, a dark green squash.
 

A couple of faux Fall foliage sprays


were placed inside,


followed by some darker ones, also faux.  


Shown here....adding a bit of drama.


The leftover pumpkins were set in a small stack at the foot of the cart.


Lastly, I added a festive bow.  I threaded wired burlap ribbon,


along with a rusty red grosgrain through the front of the cart, and tied it. 


All set for entertaining this Thanksgiving!!  So easy!  If only the clean-up after the meal were this simple!!!!  :))


A few more shots.....


Closeup.....


And a few with soft light (pretend fog?)....Well, I can pretend we have real Fall weather until it actually arrives!!  :)


Where to buy:

Cart, local florist 
Faux sprays 50% off at Big Lots
All gourds, darker faux flowers, and real flowers, local grocer
Burlap ribbon, Wal-mart
Rust-red ribbon, The Dollar Tree

Have a beautiful weekend!! 


If you enjoy this post, please visit the archives!  You may also visit my full profile to view my other blogs. Connect with me on my Facebook Page, Parsimonious Décor Darling.   You might like to visit my other blog hubs,

The Marvelous Maison, a lifestyle blog hub and 
Frugal Fab Fashionista, my fashion blog hub. 

Follow me on Pinterest!!  Please be sure to kindly follow the board guidelines, as it takes time and effort to find fabulous pins across the Internet and Pinterest!  Thank you!  

Thank you for stopping by! ❤