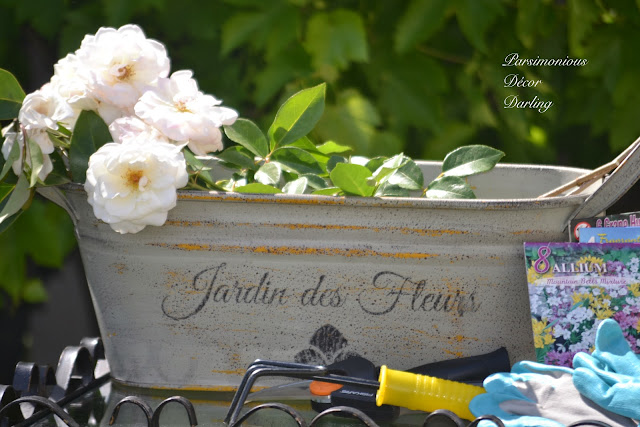
In a previous post, I shared a new little bucket I had purchased from Tai Pan Trading. I thought it would be fun to outfit the little guy with some charming lettering fit for the outdoors. I hope you enjoy the post!
First, I began by deciding what I wanted to write on the bucket. Here is where I utilized my very, very, very rusty high-school/two-semesters-in-college French.... (almost twenty years ago, oh no! Did I say rusty?) I decided to use 'Jardin des Fleurs,' which translates roughly to garden of flowers or flower garden (please correct me if not). I used a photo editor to create the graphic below.
Notice it is backward. It is crucial to print it this way because when you transfer the image, it will transfer the image from left to right correctly.
Tape waxed paper onto a standard-sized sheet of printer paper. Make sure it is completely flat with no excess, ripples, or bulges before folding over and taping down.
**Trial and error tip: I only tape two sides, otherwise, it causes a paper jam because the paper is too
thick with the tape to be fed through the machine. Trim the open sides to fit the size of the paper.
In my HP machine, I fed the paper in with the waxed paper side facing upward.
**Trial and error tip: I printed using only fast-draft quality ink. When I printed the image with best
quality, it tends to run because the wax paper is very slick, and as it is fed through the machine, it
caused the ink to bleed.
Very quickly after printing, place the image onto the metal, and using a flat edge like a ruler or credit card, firmly move over the image while holding it steady in place. You must do this very fast, because the ink dries quickly.
There are some small imperfections, but I rather like them. If you do have a mishap and need a do-over (I speak of course from experience, ha-ha), a baby wipe or paper towel with alcohol will clean it up.
Voilà! The perfect little receptacle for your garden tools,
or clipped flowers.
(Closeup)
This method is easy, and would likely work on watering cans, galvanized buckets, et cetera.....the possibilities are endless! Until next we meet (Au bientôt)........
If you enjoy this post, please visit the archives! You may also visit my full profile to view my other blogs. Connect with me on my Facebook Page, Parsimonious Décor Darling. You might like to visit my other blog hubs,
The Marvelous Maison, a lifestyle blog hub and
Frugal Fab Fashionista, my fashion blog hub.
Follow me on Pinterest!! Please be sure to kindly follow the board guidelines, as it takes time and effort to find fabulous pins across the Internet and Pinterest! Thank you!
Thank you for stopping by! ❤


.jpg)


I love this project. It is an excellent idea and it looks very authentic too. You displayed it beautifully. I particularly love those gorgeous white roses. They make me wish for mine which should be blooming in a month.
ReplyDeleteHave a great week.
Janet
Thank you, Janet! I will be looking for you to share them soon. :0)
DeleteI think it turned out beautiful! I love the vintage patina!
ReplyDeleteThank you, Benita!
DeleteLooks great! I want to try out transferring with wax paper.
ReplyDeleteThank you so much!
DeleteFabulous! Love the words you chose!
ReplyDeleteJenna
Thank you, Jenna!
DeleteLove this!! Great Job!
ReplyDeleteThank you so much!
DeleteThis is just adorable -- love the French! I've got to try the wax paper method some day. :)
ReplyDeleteThank you, Dee!
DeleteBeautiful Job! I love it.... I have probably tried all the transfer methods that are out there myself and I have to share with you what I found on Amazon. It is called Waterslide Decal Paper....This is a brilliant way for a fast and really clear image transfer.....Let me know if you have questions. Bryn.
ReplyDeleteIf you are interested here is my blog link
http://beforeandafterandstillinprogress.blogspot.com/2015/04/wall-scones-from-southern-living-at.html
Thank you, Brynja!
Deletelovely! Wonder what the next medium to receive a transfer will be - love you gals w/ creativity and ingenuity!
ReplyDeleteThank you, Joyce!
DeleteThank you for sharing this wonderful diy at the Thursday Favorite Things blog hop. Watch for your feature on Monday xo
ReplyDeleteThank you for having me! :)
DeleteThank you, Robin, my pleasure!
ReplyDeleteSo lovely--thanks for the tutorial!
ReplyDeleteBlessings....thank you! :)
DeleteI love it! I took only one quarter of French in high school and about all I can do is count to ten. lol! Love the French saying. I would love to add a number to one of my watering cans. Thanks for sharing with SYC.
ReplyDeletehugs,
Jann
You made me smile....I truly don't remember too much more, especially since over the years, I learned to I speak a little Spanish as well; being that they are both Latin-based, sometimes my brain gets them discombobulated!! Ah, age.... :)
Delete