Thursday, October 9, 2014

Set Your Table With Flair--Host a Dark Tea For Halloween

Hello, my friends!  Halloween is almost here, how fun!

If you've read my posts, you know I adore tea, and it is pretty much my beverage of choice.  In honor of the spooky season, I thought it might be fun to host a Dark Tea.  I hope you enjoy the post.

Gathering your ghouls
When planning a party, of course you must begin with the invites.  Don't get me wrong, I love Evites just as much as the next gal....it is very convenient.  I still appreciate a good old-fashioned mailed invitation as well.  I also adore handmade invitations.  It makes me feel that the host took time and spent energy to create something extra-special for their guests.  Here is my version of a spooky boxed invitation.  To view the tutorial, you may visit the post on my blog The Crafting Table by clicking here.


Planning your menu
Spooky eats and treats are a must when planning this sort of siorèe.  A great go-to resource is MarthaStewart.com!  There are so many great ideas!  Choosing macabre-looking food is a kitschy and fun way to spice up your dark event.  Here are a couple of ideas I've come up with myself.

Vette's Vampy Tea

The blood-red color of this tea fits perfectly in my theme!  To view the recipe, please visit the post on my other blog Parsimonious Pabulum by clicking here.


Super-easy Poison Apples

Don't these look naughty (but nice)?  These creepy apples are great for the Fall season, and are incredibly easy to make.  To view the recipe, visit the post here on my blog Parsimonious Pabulum.


Gifts for guests
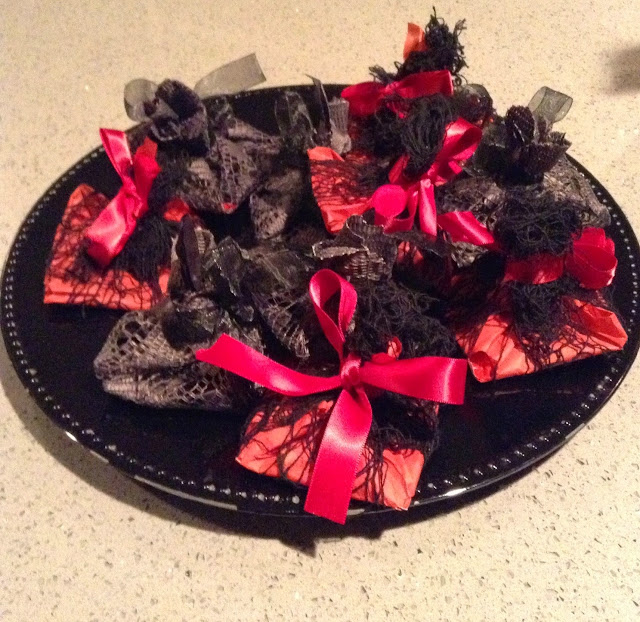
It is always nice to provide a small trinket or gift for your guests to take away from your party.  I decided little sachets with tea inside would be a darling gift for tea party guests.  They are inexpensive, and so simple!  To see the tutorial, visit the post on The Crafting Table here.

For proper attire to this dark tea, guests are asked to please don a mini Victorian top hat.  These little hats are also a great gift for friends to take away.  To see the tutorial, visit the post on The Crafting Table here. 


Who is this daffy gal?  Why, it is the lady of the manor!  ;)


Setting the Table

Finally, before guests arrive, it's time for my favorite part....setting the table.  For a dark or goth tea, color choice is imperative.  Dark red, black, royal purple, and shocking blue are great colors!  My personal preference is setting a table in dark reds or plum and black with Victorian elements. 

I began by setting this red tablecloth on the round table in my foyer.  I also added my wrought iron candle holder with a red candle inside. 


To make it appear like a darker red, and to provide a spooky element, I placed my spider web cloth directly over the red cloth.


Next, my Reed and Barton King Francis silver punch bowl and cups to give it old-world charm (even though Reed and Barton is American, I thought it was fitting).  I filled the bowl with some of Vette's Vampy tea, and also prepared several cups so they would be ready.


Closer shot.  I love the way the dark red plays against the silver!


Next, I placed these skull candle holders and red candles inside.


A dark red charger,


filled with Poison Apples came next.


A black charger,


and premade sachets sat next to the apples.
 

I browsed my library in search of books with dark-colored bindings....The Complete Works of William Shakespeare and The Works of H G Wells worked nicely.  I added them and one more book to create a stand on which to set my mirror.


The final touch.....spooky black netting over one side of the mirror.


Here are a few shots.


I wasn't sure if I liked it set up there, so I also set it up next to my ballerina table both with and without the mirror.  I bought red roses a couple of days ago with this post in mind.  The roses were wilting beautifully into a dark burgundy.  I placed a few of the roses on the ballerina table.


In place of the mirror, here I have set one of the skull candle holders.  Here are a couple shots of the setting.  I also added some of the roses to table.


Here are a few more shots. 

Without mirror


With mirror


Which do you prefer?

Closeups


If you enjoy this post, please visit the archives!  You may also visit my full profile to view my other blogs. Connect with me on my Facebook Page, Parsimonious Décor Darling.   You might like to visit my other blog hubs,

The Marvelous Maison, a lifestyle blog hub and 
Frugal Fab Fashionista, my fashion blog hub. 

Follow me on Pinterest!!  Please be sure to kindly follow the board guidelines, as it takes time and effort to find fabulous pins across the Internet and Pinterest!  Thank you!  

Thank you for stopping by! ❤


Sunday, September 14, 2014

Set Your Table With Flair--Back To Blogging/Simple Beach Tablescape

Hello, dear friends!  Thank you so, so much for stopping in!  After a much-needed hiatus and Summer fun with the hubs and kiddos, I feel it is time to get back to business-as-usual.  I will begin by saying I hope everyone has enjoyed their Summer!  I've been away awhile; I've also been pretty busy as of late in preparation for a community production of Dolly Parton's Broadway adaptation of 9 to 5!!  I adored the movie when I was younger, and I thought, how fun!!  Praying for a good show! 

The end of the season is almost here!  Summer hasn't officially ended quite yet (and it is still soooo HOT in CA), so in today's post, I thought I'd share a very simple, inexpensive tablescape idea in the spirit of Summer.  I hope you enjoy the post!!

I began the tablescape with this lovely beach-y linen.  I love the sandy/ocean-y color of this fabric! 


To serve as my centerpiece, I set a small pail.


To create the illusion of a day at the beach, spilling out of the pail are seashells.


Next, I set simple bamboo placemats, indicative of sand.


Closer look. 


On either side of the table, I set blue lanterns.


Closer view. 


I placed blue ombré-design plates. 


Closer.  I just love the varying blue hues....reminds me of the many facets of the ocean and sky. 


I set these cute ocean-blue tumblers next. 


On each plate, I used a mini galvanized bucket as a napkin ring.  I'm noticing and loving how the light reflects in the tumbler here, almost like a pool or clear ocean water!  


Here is a shot of the napkins and tiny buckets. 


In each bucket, I laid a starfish. Simple. 


For summer, I am not fussy about utensils, as most summer food is eaten with the hands.  If needed, I usually use disposable. Here is a look at the completed tablescape, flatware omitted. 


A couple more shots. 


Closeup of the setting.  Easy-peasy, no-muss, no-fuss.  For me, Summer is all about relaxing!  


From my collection:
Linen, local thrift
Pail, Michael's Crafts
Bamboo mats, The 99¢ Store
Plates and tumblers, Big Lots
Napkins, generic. HomeGoods
Lanterns, Ikea
Mini buckets, starfish, and shells, The Dollar Tree


If you enjoy this post, please visit the archives!  You may also visit my full profile to view my other blogs. Connect with me on my Facebook Page, Parsimonious Décor Darling.   You might like to visit my other blog hubs,

The Marvelous Maison, a lifestyle blog hub and 
Frugal Fab Fashionista, my fashion blog hub. 

Follow me on Pinterest!!  Please be sure to kindly follow the board guidelines, as it takes time and effort to find fabulous pins across the Internet and Pinterest!  Thank you!  

Thank you for stopping by! ❤


Friday, July 4, 2014

Happy Independence Day 2014!!

Hello, friends!  Thank you so much for stopping by my blog! 

I hope everyone out in bloggerland enjoyed a wonderful Independence Day!  Things are simmering down here at the Parsimonious house, the fireworks have just ended.  I had a very busy and productive day.....it's relax time.  Although festivities for the day have ended, I wanted to share three quick tips I used today to help make our celebration go off without a hitch. I hope you enjoy the post.  


Dress Up Your Silverware Service 


Today, when I served my family, I thought it would be a fun idea to dress up a simple silverware caddy in festive colors. 

You will need:

A simple perforated silverware caddy
Grosgrain ribbon in red, white, and blue


First, size up


and cut enough strips of ribbon, one for each row of holes. 


Like so. 


Thread the ribbon through the holes.  


Once all your ribbon is threaded,

Tie.  


Here, I tied one red, one white, and one blue ribbon together in a bow.


Side View. 


Another variation is to tie each ribbon individually. Shown here.  


Side View.


Great Burgers Your Family Will Devour

While my meat marinates prior to barbecuing, I also prepare my hamburger meat. 


This trick I learned from my uncle makes burgers not only have a wonderful flavor, but they practically melt in your mouth.   Prior to cooking, add a bit of barbecue sauce, mustard, ketchup, and A-1 and/or Worcestershire Sauce along with your seasonings to the meat and mix thoroughly.  Use approximately one-half tablespoon of each per one pound of ground beef. Yum!


To view my simple BBQ marinade, you may visit the post in the archives here. 


Festive Citronella Mini Pots

The final tidbit I completed in preparation for today were these little patriotic citronella candle pots.  


We live in California, and the weather is beautiful and sunny most of the time.  The downside to that is unfortunately, it is against the law to have personal fireworks in certain counties.  We reside in one such county.  Boooo.  I have such good memories of setting off fireworks as a child, I sometimes wish my children would have the same.  :(
To make tonight special, I made each of my smaller children "mock" fireworks with these festive little candles.  

You will need:

Mini citronella candle clay pots

Mini stars stickers
Mini rolls of tape
Red, white, and blue paint
Paintbrush 

Begin by painting the clay pots completely white. Allow to dry. 


Once dry, place star stickers onto the white pot. On some of the pots, I placed stickers on the top rim,


and on others, I did so on the bottom portion. 


On the alternate side (top rim or bottom half), place spaced strips of mini tape. 


After the stickers are fastened, paint blue right over the area where there are star stickers, and red right over the strips of tape. 


Allow dry time.


Once dry, carefully peel the stickers and tape off.  Voilà!!


I painted to clean up the lines a little....but these were for my kiddos after all, so I wasn't too worried that they weren't perfect. 


They were excited to hold them during the firework display!  These could also dub as gifts for guests (although then I'd likely be a bit more OCD, lol) or even down the middle of a table in a tablescape.  What's great about these is that the citronella keeps the bugs away.  To read other ways to ward off summertime pests, visit the post in the archives here. 


Where to buy:
Silverware caddy:  Ikea
Grosgrain ribbon, The 99¢ Store
Mini Citronella Candle Pots, HomeGoods
Mini Tape rolls, The 99¢ Store
Stars stickers, The 99¢ Store


Have a blessed and safe holiday from our family to yours!  


If you enjoy this post, please visit the archives!  You may also visit my full profile to view my other blogs. Connect with me on my Facebook Page, Parsimonious Décor Darling.   You might like to visit my other blog hubs,

The Marvelous Maison, a lifestyle blog hub and 
Frugal Fab Fashionista, my fashion blog hub. 

Follow me on Pinterest!!  Please be sure to kindly follow the board guidelines, as it takes time and effort to find fabulous pins across the Internet and Pinterest!  Thank you!  

Thank you for stopping by! ❤