Thursday, January 15, 2015

Reuse and Repurpose an Old Basket


Hello, my Friends!  Thank you so much for visiting today!

Do you love to repurpose and reuse things?  I know I certainly do!  I love the idea of using something already on hand and refurbishing or retooling it into something useful or something completely different. 

This past Christmas, one of the gifts we received arrived in this basket.  I set it aside, wanting to use it, but not knowing what for until inspiration hit a couple of days ago.  Here is my process.

First, I wanted to change its color, because it really doesn't match my décor.  I began by painting the basket with a quick coat of Zinsser Bullseye 1-2-3 Primer.  I love this stuff!  It adheres to just about any surface, making a semi-rough finish that stain or paint will bond to easily.


I almost wanted to leave the basket this color, it was sooo pretty (very Shabby!), or chalk paint it a similar shade and fill it with flowers, but my countertops are very light in color, so it would likely look washed out.  It's an option you can consider, especially if you have French Country décor in your home.

After allowing dry time, I spray painted the basket with a dark espresso color from Rustoleum Metallics.  What a difference!

Now, it is a perfect receptacle for guest towels.  After I allowed the basket to dry, I placed some towels inside. To give the towels a little extra charm, I tried out one of the new toys of the Parsimonious house.  For Christmas, we got this Brother embroidery machine.  This is the first time I used it, and I absolutely love it!  You simply pick a font, and the machine does the work for you!  Isn't technology great!?


Here are the completed towels after they were embroidered.


Nestled in their new home.  :)


Finally, I created a placard for the basket.  Here is my process.  
You will need:

Wax paper
Printer paper
A small wooden board
A printer
A drill
Scotch tape
Thick tape such as duct, electric et cetera


I began by cutting my wood piece to size, and sanding it, including rounding the edges.


I made two holes in the top for hanging.  To prevent the wood from splintering, I taped pieces of duct tape to it prior to drilling the holes.


Once the holes were drilled,


I removed the tape and sanded again.


Transfering imagery onto the wood:

This part was so fun!  I found out recently that you can transfer just about any image to wood using an ink-jet printer and wax paper.

First, I cut wax paper to size of a standard piece of printer paper, leaving about an inch on two of the sides.  Those two sides were folded down and taped with scotch tape.

Ready for the printer.


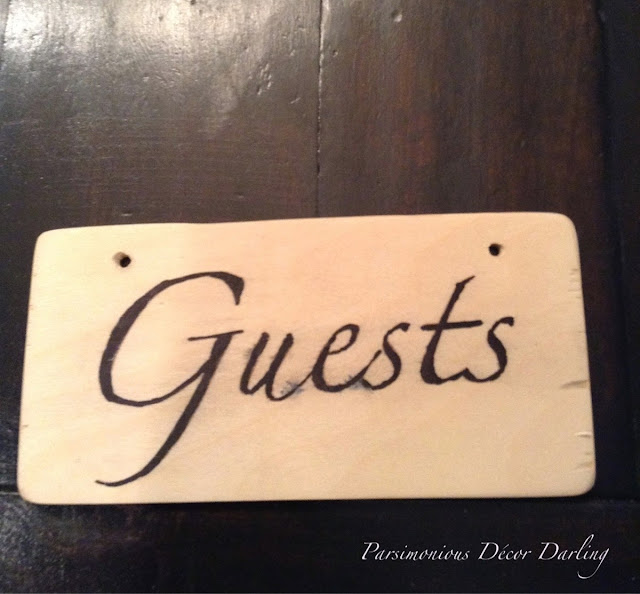
I used a photo editor to create a large image of the word "Guests."  Be sure to print the image backwards onto your paper so that when you transfer the image, it will appear the correct way.  The image transfers darker if you use a minimum amount of water on the wood.  Think baby-wipe dampness; use a paper towel to wipe across the wood just before you transfer.  I intended to paint my placard, so I carefully went over the image with a sharpie.  I didn't mind the bit of smearing that occurred during printing, all more the charm.


After the ink and sharpie dried, I painted over the plaque with Annie Sloan chalk paint in Paris Grey.  The paint is fairly opaque, so I diluted it to almost water-color consistency with water prior to painting.


Here is the completed signage.


Finally, I threaded a bit of sheer ribbon through the plaque and tied it to the front of the basket, knotted  it behind, and trimmed away the excess ribbon.


All ready for the bath.


In the bathroom.


Closeup.


You can also use this in a guest bedroom, and fill it with soaps, shampoos, lotion, et cetera!  


If you enjoy this post, please visit the archives!  You may also visit my full profile to view my other blogs. Connect with me on my Facebook Page, Parsimonious Décor Darling.   You might like to visit my other blog hubs,

The Marvelous Maison, a lifestyle blog hub and 
Frugal Fab Fashionista, my fashion blog hub. 

Follow me on Pinterest!!  Please be sure to kindly follow the board guidelines, as it takes time and effort to find fabulous pins across the Internet and Pinterest!  Thank you!  

Thank you for stopping by! ❤


Thursday, January 8, 2015

Set Your Table With Flair--Mid-Winter Brunch


Hello, Friends!  Thank you so much for stopping by!!

Although warm weather is nowhere in sight as we are slowly trod towards the end of winter, well...at least for me, it is the end of winter tables.  As it is so nippy inside, it is the perfect time to enjoy heavy (naughty!!) food and hot beverages indoors.  Is it cold in your neck of the woods?  Here in California, this has been one of the coldest winters I can remember, and we have even had a tiny bit of snow in cities approximately fifteen minutes from where I live!!  I so wish we would have had a little, my kiddos would have loved to see snow right outside their door, but we just got torrential rain....boo. 

Today I am sharing a casual tablescape perfect for a mid-winter brunch.  Very continental!  I hope you enjoy the post. 

I began this setting on a table barren of linen.  Stark navy and white placemats were followed by navy chargers.  To complete this casual table, my simple white plates were placed, followed by blue transferware and simple white saucers.


Crisp navy napkins held by modern-style silver completes the stack.


Creamy winter-white coffee mugs alongside tiny pastry accoutrements were placed at the head of each setting, and modern flatware.


A modern tea and coffee service tops the table, in its own silver tray.


To keep the centerpiece simple, topiary trees of preserved boxwood were placed down the middle of the table.


I love the pop of green!!  There is something so refreshing about crisp white, navy, and dark or vibrant green....I love combining those colors!


A footed cake plate with some treats is seated at the other side of the table.  I love little coffee cakes and Italian waffle cookies!  Delish!


Completed Tablescape. 


From my collection:

White and navy placemats, Tai Pan Trading
Navy Chargers, Horchow/Neiman Marcus
Simple white plates and saucers, Ralph Lauren Club Collection
Blue and white transferware, Spode Blue Room
Pastry forks, Spode Blue Italian, HomeGoods
Navy napkins, generic, HomeGoods
Modern tea and coffee service, Godinger Hotel Collection/Horchow & Neiman Marcus
Modern napkin holders, Ikea Spalt
Coffee cups, Ralph Lauren Whipstich Collection, Horchow/Neiman Marcus
Footed cake plate, Ralph Lauren Pavilion
Flatware, Mikasa Zena Satin
Preserved boxwood trees, Tai Pan Trading.  You may read more about my purchase of them in the archives here.


If you enjoy this post, please visit the archives!  You may also visit my full profile to view my other blogs. Connect with me on my Facebook Page, Parsimonious Décor Darling.   You might like to visit my other blog hubs,

The Marvelous Maison, a lifestyle blog hub and 
Frugal Fab Fashionista, my fashion blog hub. 

Follow me on Pinterest!!  Please be sure to kindly follow the board guidelines, as it takes time and effort to find fabulous pins across the Internet and Pinterest!  Thank you!  

Thank you for stopping by! ❤

Tuesday, January 6, 2015

A Refreshing Look For the New Year


Hello, Friends!  Thank you kindly for taking the time to stop by my blog!

Bidding adieu to Christmas can be bittersweet.  I wish it could last forever!  However, with the New Year comes promise and a renewed sense of enthusiasm for me, does it for you?   Have you made any resolutions? 

Just prior to Christmas, I was out shopping at my local Williams Sonoma.  I am a fan of the store, as well as its affiliates Pottery Barn and West Elm.  While there, I happened upon these gorgeous preserved cypress topiary balls,


and preserved cypress trees.


Really beautiful!  However, the price of $50 each for the smallest of the selection seemed a bit steep to me.  It did however, get me inspired, and I began thinking about preserved boxwoods or cypress. A few days later, I did some searching via the internet and found there wasn't much variation in price.....they are expensive!  For example, Restoration Hardware's goregous boxwoods cost $25 for the tiniest ball measuring just 5 1/2",


and the smallest of their trees, shown here, $49.


My intent had been to incorporate some preserved cypress or boxwood into my Christmas décor, but at these prices, it gave me pause, and I shelved the notion hoping to maybe return post-Christmas and catch them on sale.

Fast forward to yesterday.  I was perusing at one of my favorite haunts, TaiPan Trading, and I happened across these gorgeous boxwood topiary trees.  They are genuine preserved boxwood, and I was so excited that each only cost $22, plus I had a coupon for 25% off of one.  SOLD!  I adore the rustic little cement pots each tree is nestled in....perfect for my house which has a cement planter in the foyer.
 

I also snapped up this darling little metal long-length bucket....too cute.


These topiaries look great on my dinner table alone,


or in the bucket.....


they also look great in the kitchen, where I placed them in a serving tray I bought long ago but no longer use for serving.  I usually use the tray for little vignettes around the house, but here it works well because of the contrasting color.


How to prolong the life of your preserved boxwood:

A). Keep away from direct light, or the boxwoods will turn golden yellow in color

B). Keep out of humid temperatures

C). Sporadically spray with water to keep fragrance longer and to keep fresh

Adding these little guys really gave the house a fresh feeling, and I may return for more! :)


If you enjoy this post, please visit the archives!  You may also visit my full profile to view my other blogs. Connect with me on my Facebook Page, Parsimonious Décor Darling.   You might like to visit my other blog hubs,

The Marvelous Maison, a lifestyle blog hub and 
Frugal Fab Fashionista, my fashion blog hub. 

Follow me on Pinterest!!  Please be sure to kindly follow the board guidelines, as it takes time and effort to find fabulous pins across the Internet and Pinterest!  Thank you!  

Thank you for stopping by! ❤


Saturday, January 3, 2015

The Importance of the Handwritten Note

Hello, friends!  Thank you for stopping by today.

As Christmastime comes to its inevitable end, I usually use the first week of January for taking down the winter décor and writing thank-you notes.  

In our fast-paced, modern, ever-technical world, it seems like writing a note has become passé. There is even an ongoing debate over whether or not penmanship (or cursive) should continue to be taught in schools.  I stand staunchly on the ideal that this form of classicism should not die!  I feel it needs to be preserved, especially when old records and doctrines are written solely in longhand.  Also, I love the romantic idea of receiving something that has been hand-written!  Ok, ok, enough from the pulpit, lol.  In today's post, I am sharing a couple of ideas to add a tiny bit of fun and charm for those of us who still appreciate this (perhaps now considered archaic) form of communicating.  I hope you enjoy the post!  

During a recent trip to my local HomeGoods, I stumbled upon these adorable little notecards.  These little cards are empty inside, and perfect for jotting down a little heart-felt thank-you.  At $4 for the box of twelve (and tartan!!), I thought it was a great deal!


First, I sprayed a tiny square of paper and each notecard generously with my one of favorite scents of the season, Ralph Lauren's Holiday Stroll.  The box reads, "A blend of warm baked apple with cinnamon, clove and vanilla."  Yum!  Allow time for drying.


Next, I wrote my thank-yous and enclosed the bits of paper in the notecard. After writing, I decided to make each card look like a little individual present. This also ensures that the scented paper stays put when the card is removed from the envelope.  To do that, I simply adorned each little card with a bit of ribbon, double-bow-tied.


After closing, I stamped the envelope with my monogram stamper.  All set to be mailed!  Hopefully they will still smell lovely when they reach their destination!


Where do you stand on the cursive/no cursive in schools debate?


1/4/2015 1:44 P.M.  Update to post:  As I finished up the rest of my cards, I thought it would be an even cuter idea to enclose patterned plaid scrapbook paper cut into fun shapes rather than plain paper. Shown here.  


In closing, a bit of writing from me to you!  :)


If you enjoy this post, please visit the archives!  You may also visit my full profile to view my other blogs. Connect with me on my Facebook Page, Parsimonious Décor Darling.   You might like to visit my other blog hubs,

The Marvelous Maison, a lifestyle blog hub and 
Frugal Fab Fashionista, my fashion blog hub. 

Follow me on Pinterest!!  Please be sure to kindly follow the board guidelines, as it takes time and effort to find fabulous pins across the Internet and Pinterest!  Thank you!  

Thank you for stopping by! ❤