

Do you love to repurpose and reuse things? I know I certainly do! I love the idea of using something already on hand and refurbishing or retooling it into something useful or something completely different.
This past Christmas, one of the gifts we received arrived in this basket. I set it aside, wanting to use it, but not knowing what for until inspiration hit a couple of days ago. Here is my process.

First, I wanted to change its color, because it really doesn't match my décor. I began by painting the basket with a quick coat of Zinsser Bullseye 1-2-3 Primer. I love this stuff! It adheres to just about any surface, making a semi-rough finish that stain or paint will bond to easily.


I almost wanted to leave the basket this color, it was sooo pretty (very Shabby!), or chalk paint it a similar shade and fill it with flowers, but my countertops are very light in color, so it would likely look washed out. It's an option you can consider, especially if you have French Country décor in your home.
After allowing dry time, I spray painted the basket with a dark espresso color from Rustoleum Metallics. What a difference!

Now, it is a perfect receptacle for guest towels. After I allowed the basket to dry, I placed some towels inside. To give the towels a little extra charm, I tried out one of the new toys of the Parsimonious house. For Christmas, we got this Brother embroidery machine. This is the first time I used it, and I absolutely love it! You simply pick a font, and the machine does the work for you! Isn't technology great!?

Here are the completed towels after they were embroidered.


Nestled in their new home. :)
Finally, I created a placard for the basket. Here is my process.
You will need:
Wax paper
Printer paper
A small wooden board
A printer
A drill
Scotch tape
Thick tape such as duct, electric et cetera
I began by cutting my wood piece to size, and sanding it, including rounding the edges.
I made two holes in the top for hanging. To prevent the wood from splintering, I taped pieces of duct tape to it prior to drilling the holes.
Once the holes were drilled,
I removed the tape and sanded again.
Transfering imagery onto the wood:
This part was so fun! I found out recently that you can transfer just about any image to wood using an ink-jet printer and wax paper.
First, I cut wax paper to size of a standard piece of printer paper, leaving about an inch on two of the sides. Those two sides were folded down and taped with scotch tape.
Ready for the printer.
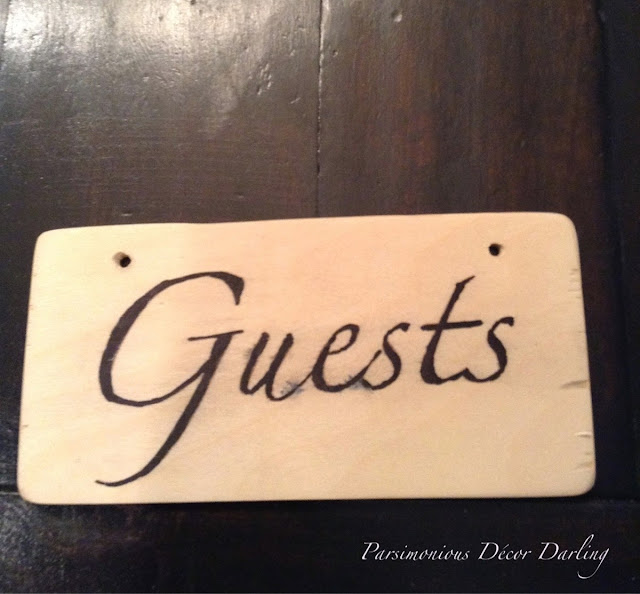
I used a photo editor to create a large image of the word "Guests." Be sure to print the image backwards onto your paper so that when you transfer the image, it will appear the correct way. The image transfers darker if you use a minimum amount of water on the wood. Think baby-wipe dampness; use a paper towel to wipe across the wood just before you transfer. I intended to paint my placard, so I carefully went over the image with a sharpie. I didn't mind the bit of smearing that occurred during printing, all more the charm.
After the ink and sharpie dried, I painted over the plaque with Annie Sloan chalk paint in Paris Grey. The paint is fairly opaque, so I diluted it to almost water-color consistency with water prior to painting.
Here is the completed signage.
Finally, I threaded a bit of sheer ribbon through the plaque and tied it to the front of the basket, knotted it behind, and trimmed away the excess ribbon.
All ready for the bath.
In the bathroom.
Closeup.
You can also use this in a guest bedroom, and fill it with soaps, shampoos, lotion, et cetera!
If you enjoy this post, please visit the archives! You may also visit my full profile to view my other blogs. Connect with me on my Facebook Page, Parsimonious Décor Darling. You might like to visit my other blog hubs,
The Marvelous Maison, a lifestyle blog hub and
Frugal Fab Fashionista, my fashion blog hub.
Follow me on Pinterest!! Please be sure to kindly follow the board guidelines, as it takes time and effort to find fabulous pins across the Internet and Pinterest! Thank you!
Thank you for stopping by! ❤
How creative! I would have never thought of repainting the basket (although I paint almost everything else)! I love it all put together!
ReplyDeleteThank you, Leesha!
Delete..This is so lovely. I would use it also to put extra ' toiletry ' items in , for guests.
ReplyDelete;)
DeleteThank you so much for visiting!
Cute and creative! Have a nice weekend!
ReplyDeleteMonika
Thank you, Monika!
DeleteSo beautiful! Thank you for walking us through the steps you took. I often see baskets at the thrift shop and now I have a reason to buy one! :-)
ReplyDeleteThank you, Gina! Happy hunting! :)
Delete