Thursday, October 23, 2014

Set Your Table With Flair--A Bootastic Burton Halloween


Hello, friends!!  Thank you so much for popping into my little corner of blogland!  I do adore celebrating holidays, don't you?  In just over a week, it will be Halloween, whoo-hoo!  Today, I wanted to share one last tablescape indicative of the spooktacular season.

I'll begin by stating I am a child of the 80's, and that I was a fan of director Tim Burton before I knew who he was.  I knew his work then mostly because of my adoration at the time of the film PeeWee's Big Adventure.  Later, I grew to love Beetlejuice, The Nightmare Before Christmas, 9, Edward Scissorhands, Batman, and many, many others. 

Mr. Burton may have started as having only a cult following, but as a result of the Henry Selick's ingenious stop-motion animation interpretation of Burton's brilliant The Nightmare Before Christmas, at long last, he is recognized for the amazing creative he is.  It might also be attributed to when he decided to align himself with the company of another brilliant mind and innovator, Walt Disney.  In honor of Mr. Burton, that wacky and wonderful wizard of wicked whimsy, that master of magical macabre, I have set this table as a sort of homage.  I hope you enjoy the post.

I began the setting with a striped tablecloth.  If you are a Burton fan, you know that stripes are a recurring theme in several of his films.


For a spooky element, I added some black netting to the chandelier.


As a centerpiece, I placed my pre-made Mr. Pumpkinhead.
 

Mr. Pumpkinhead reminds me of the bevy of pumpkins AND Jack Skellington before his transformation, all of whom appear in the opening credits of A Nightmare Before Christmas.  Sitting in a coffin (creepy!) atop of throne of skulls indicative of those in Tim Burton's Corpse Bride.

Here is a glimpse of Mr. Burton's exhibit at MOMA NYC (Museum of Modern Art) which ended in April 2009.  Do you see the similiarities?  If you'd like to see more of the exhibit, you may visit the article in the Los Angeles Times here.
 

To view the tutorial about how I made this spooky centerpiece, you may do so by visiting the post on my blog The Crafting Table here. 


At either side of the table, large buttons were placed, reminiscent of the button eyes in Henry Selick's Coraline.  As mentioned, Henry Selick was a director and collaborator on both Burton's Nightmare Before Christmas and James and the Giant Peach, so I enjoyed this film which had a similar style.   I have been a fan of his since I first saw his animated short Slow Bob In the Lower Dimensions which was featured on MTV's Liquid Television ages ago when I was still in my teens!!

The Other Mother


Closer look.  These were simple room décor hangers I spray painted black.


In two of the button holes of each button, I placed some spooky "trees," as seen in many Burton films.


These were small branches I also spray-painted black.


On either side of the centerpiece, I set skull candle holders with black tapers.


In front of those, I set a pair of my striped Mackenzie-Childs-inspired candles.


To view the tutorial to make these fun candles, visit the post on The Crafting Table here. 


Alternating web placemats


were followed by alternating silver chargers.


Where there were silver chargers, I placed web placemats....


and where there were web placemats, I placed black chargers.


On each silver charger, I set clear plates.


Closeup.


On each black charger, I set white plates.


Closeup.


The white plates were followed by dark saucers,


and the clear plates were followed by white saucers.


At each setting where there was a white saucer and silver charger, I set black napkins folded length-wise.


At each setting where there was a black saucer and black charger, I set white napkins folded length-wise.


At each setting, a small gift box in stripes (of course!) adorned with a bat nametag indicative of the Burton film Batman starring Michael Keaton.


 Aren't these quirky-cool?  To view the tutorial, you may visit the post on the crafting table here.


Finally, I set a simple flute and black tumbler at each setting.


All set! 


Here is a closeup of each setting.  Silver charger setting.


Black Charger setting.


A few more shots.....


Here's wishing you a safe, fun, and happy Halloween!!

From my collection:

Striped "tablecloth," blanket from Ikea
Silver chargers, generic
Black chargers, generic
White plates and saucers, Ralph Lauren Whipstitch Collection
Dark saucers, generic
Clear plates, generic
Spider web placemats, The Dollar Tree
Skull candle holders, The 99¢ Store
Linen napkins, both, generic, HomeGoods
Spooky cloth, The Dollar Tree
Large button wall art, Hobby Lobby
Stemware and tumblers, generic


Also, a sidebar; if you are interested in the bench featured here in this post, it is handmade, and you may visit the tutorial to build my DIY highback bench by looking in the archives or clicking here.  Thank you!


If you enjoy this post, please visit the archives!  You may also visit my full profile to view my other blogs. Connect with me on my Facebook Page, Parsimonious Décor Darling.   You might like to visit my other blog hubs,

The Marvelous Maison, a lifestyle blog hub and 
Frugal Fab Fashionista, my fashion blog hub. 

Follow me on Pinterest!!  Please be sure to kindly follow the board guidelines, as it takes time and effort to find fabulous pins across the Internet and Pinterest!  Thank you!  

Thank you for stopping by! ❤


Thursday, October 9, 2014

Set Your Table With Flair--Host a Dark Tea For Halloween

Hello, my friends!  Halloween is almost here, how fun!

If you've read my posts, you know I adore tea, and it is pretty much my beverage of choice.  In honor of the spooky season, I thought it might be fun to host a Dark Tea.  I hope you enjoy the post.

Gathering your ghouls
When planning a party, of course you must begin with the invites.  Don't get me wrong, I love Evites just as much as the next gal....it is very convenient.  I still appreciate a good old-fashioned mailed invitation as well.  I also adore handmade invitations.  It makes me feel that the host took time and spent energy to create something extra-special for their guests.  Here is my version of a spooky boxed invitation.  To view the tutorial, you may visit the post on my blog The Crafting Table by clicking here.


Planning your menu
Spooky eats and treats are a must when planning this sort of siorèe.  A great go-to resource is MarthaStewart.com!  There are so many great ideas!  Choosing macabre-looking food is a kitschy and fun way to spice up your dark event.  Here are a couple of ideas I've come up with myself.

Vette's Vampy Tea

The blood-red color of this tea fits perfectly in my theme!  To view the recipe, please visit the post on my other blog Parsimonious Pabulum by clicking here.


Super-easy Poison Apples

Don't these look naughty (but nice)?  These creepy apples are great for the Fall season, and are incredibly easy to make.  To view the recipe, visit the post here on my blog Parsimonious Pabulum.


Gifts for guests
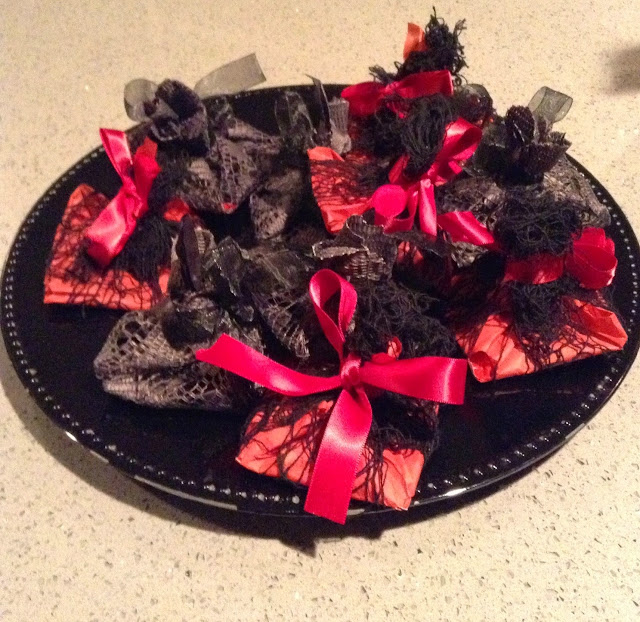
It is always nice to provide a small trinket or gift for your guests to take away from your party.  I decided little sachets with tea inside would be a darling gift for tea party guests.  They are inexpensive, and so simple!  To see the tutorial, visit the post on The Crafting Table here.


For proper attire to this dark tea, guests are asked to please don a mini Victorian top hat.  These little hats are also a great gift for friends to take away.  To see the tutorial, visit the post on The Crafting Table here. 


Who is this daffy gal?  Why, it is the lady of the manor!  ;)


Setting the Table

Finally, before guests arrive, it's time for my favorite part....setting the table.  For a dark or goth tea, color choice is imperative.  Dark red, black, royal purple, and shocking blue are great colors!  My personal preference is setting a table in dark reds or plum and black with Victorian elements. 

I began by setting this red tablecloth on the round table in my foyer.  I also added my wrought iron candle holder with a red candle inside. 


To make it appear like a darker red, and to provide a spooky element, I placed my spider web cloth directly over the red cloth.


Next, my Reed and Barton King Francis silver punch bowl and cups to give it old-world charm (even though Reed and Barton is American, I thought it was fitting).  I filled the bowl with some of Vette's Vampy tea, and also prepared several cups so they would be ready.


Closer shot.  I love the way the dark red plays against the silver!


Next, I placed these skull candle holders and red candles inside.


A dark red charger,


filled with Poison Apples came next.


A black charger,


and premade sachets sat next to the apples.
 

I browsed my library in search of books with dark-colored bindings....The Complete Works of William Shakespeare and The Works of H G Wells worked nicely.  I added them and one more book to create a stand on which to set my mirror.


The final touch.....spooky black netting over one side of the mirror.


Here are a few shots.


I wasn't sure if I liked it set up there, so I also set it up next to my ballerina table both with and without the mirror.  I bought red roses a couple of days ago with this post in mind.  The roses were wilting beautifully into a dark burgundy.  I placed a few of the roses on the ballerina table.


In place of the mirror, here I have set one of the skull candle holders.  Here are a couple shots of the setting.  I also added some of the roses to table.


Here are a few more shots. 

Without mirror


With mirror


Which do you prefer?

Closeups


If you enjoy this post, please visit the archives!  You may also visit my full profile to view my other blogs. Connect with me on my Facebook Page, Parsimonious Décor Darling.   You might like to visit my other blog hubs,

The Marvelous Maison, a lifestyle blog hub and 
Frugal Fab Fashionista, my fashion blog hub. 

Follow me on Pinterest!!  Please be sure to kindly follow the board guidelines, as it takes time and effort to find fabulous pins across the Internet and Pinterest!  Thank you!  

Thank you for stopping by! ❤


Sunday, September 14, 2014

Set Your Table With Flair--Back To Blogging/Simple Beach Tablescape

Hello, dear friends!  Thank you so, so much for stopping in!  After a much-needed hiatus and Summer fun with the hubs and kiddos, I feel it is time to get back to business-as-usual.  I will begin by saying I hope everyone has enjoyed their Summer!  I've been away awhile; I've also been pretty busy as of late in preparation for a community production of Dolly Parton's Broadway adaptation of 9 to 5!!  I adored the movie when I was younger, and I thought, how fun!!  Praying for a good show! 

The end of the season is almost here!  Summer hasn't officially ended quite yet (and it is still soooo HOT in CA), so in today's post, I thought I'd share a very simple, inexpensive tablescape idea in the spirit of Summer.  I hope you enjoy the post!!

I began the tablescape with this lovely beach-y linen.  I love the sandy/ocean-y color of this fabric! 


To serve as my centerpiece, I set a small pail.


To create the illusion of a day at the beach, spilling out of the pail are seashells.


Next, I set simple bamboo placemats, indicative of sand.


Closer look. 


On either side of the table, I set blue lanterns.


Closer view. 


I placed blue ombré-design plates. 


Closer.  I just love the varying blue hues....reminds me of the many facets of the ocean and sky. 


I set these cute ocean-blue tumblers next. 


On each plate, I used a mini galvanized bucket as a napkin ring.  I'm noticing and loving how the light reflects in the tumbler here, almost like a pool or clear ocean water!  


Here is a shot of the napkins and tiny buckets. 


In each bucket, I laid a starfish. Simple. 


For summer, I am not fussy about utensils, as most summer food is eaten with the hands.  If needed, I usually use disposable. Here is a look at the completed tablescape, flatware omitted. 


A couple more shots. 


Closeup of the setting.  Easy-peasy, no-muss, no-fuss.  For me, Summer is all about relaxing!  


From my collection:
Linen, local thrift
Pail, Michael's Crafts
Bamboo mats, The 99¢ Store
Plates and tumblers, Big Lots
Napkins, generic. HomeGoods
Lanterns, Ikea
Mini buckets, starfish, and shells, The Dollar Tree


If you enjoy this post, please visit the archives!  You may also visit my full profile to view my other blogs. Connect with me on my Facebook Page, Parsimonious Décor Darling.   You might like to visit my other blog hubs,

The Marvelous Maison, a lifestyle blog hub and 
Frugal Fab Fashionista, my fashion blog hub. 

Follow me on Pinterest!!  Please be sure to kindly follow the board guidelines, as it takes time and effort to find fabulous pins across the Internet and Pinterest!  Thank you!  

Thank you for stopping by! ❤